Cocoa Tutorial: Adding Plugins to a Cocoa Application
A couple of weeks ago we discussed how to build frameworks and how to bundle them with a Cocoa application. This week we are going to build on that knowledge and add Plug-ins to a Cocoa application.
Why are these topics linked?
Generally, there are a few ways to add plug-ins to a Cocoa application.
Scriptable plug-ins
Scriptable plug-ins are probably the easiest to add to an application. They exist in a known location where the application can load them and run them in the appropriate virtual machine. This makes them fairly easy to construct even though the code to run them may be rather complicated.
Publishing a Formal Protocol Plug-ins Interface
This one is a bit more complicated. The developer (you and me) publish a formal protocol that the plug-ins must adhere to. This design works rather well but does not allow us, the application developer, to impart any functionality to the plug-ins easily.
Publishing an Informal Protocol Plug-ins Interface
This is very similar to the formal plug-ins above but a little more tricky. Since the protocol is informal, we have to test for each method that we want to use in the plug-ins before we can use it. Again, it does not make it very easy for us to impart functionality to the plug-ins.
Publishing a Base Class Plug-ins Interface
This is the hardest option I have found so far. Not only do we have to give our plug-ins developers a header file but something to actually compile against. However, with a base class we can easily impart functionality to our plug-ins without the plug-ins developer having to jump through too many hoops.
Creating a base class solution is where frameworks come in. It makes it fairly trivial to hand off a base class to plug-ins developers when we give them a framework. Therefore, we are going to add one class to the plug-ins we wrote previously with the following header:
#import

@interface AbstractPlugin : NSObject
{

}

- (NSString*)name;

- (IBAction)fire:(id)sender;

@end
And since I like to make it stupidly easy for people, we are going to use the following implementation of the base “abstract” class:
#import "AbstractPlugin.h"

#define kErrFormat @"%s not implemented in subclass %@"
#define kExceptName @"CIMGF"

@implementation AbstractPlugin

- (NSString*)name;
{
  NSString *reason = [NSString stringWithFormat:kErrFormat,
    _cmd, [self class]];
  @throw [NSException exceptionWithName:kExceptName
                                 reason:reason
                               userInfo:nil];
}

- (IBAction)fire:(id)sender;
{
  NSString * reason = [NSString stringWithFormat:kErrFormat,
    _cmd, [self class]];
  @throw [NSException exceptionWithName:kExceptName
                                 reason:reason
                               userInfo:nil];
}

@end
For every method that the subclass must override the abstract class will throw an exception if it is not overwritten with a polite message explaining what method in which class is missing.
Building the plug-ins
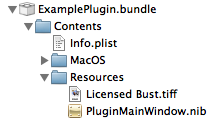
A plug-ins is effectively just a bundle, like a framework or an application. Inside of the bundle is a Contents directory, MacOS directory (where the binary goes) and a Resources directory.
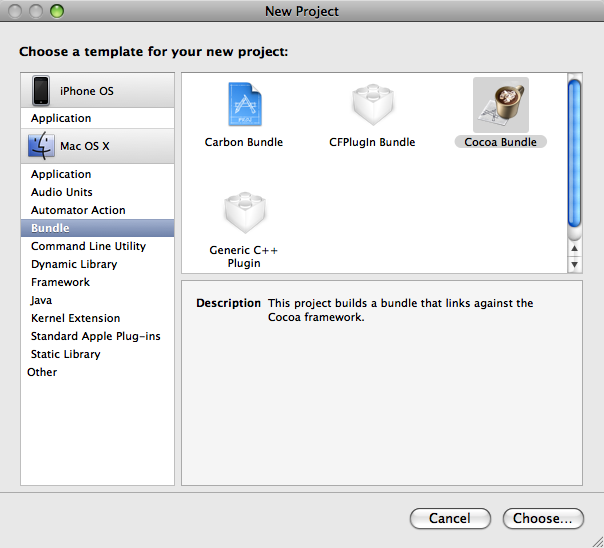
Xcode has a template for building plug-ins that we can use to get started. For this first plug-ins, we are going to just add it to our existing project as a new target.
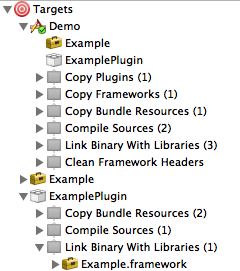
This new target is very similar to the Framework target that we built previously. We want to drag it up into the Application’s target so that it is a dependency; this can also be done from the Get Info window. We will also want to add the Framework product as a linked framework in the plug-ins. The end result looks like this.
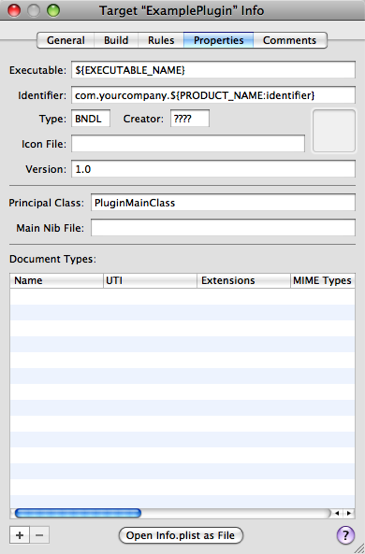
Once we have the target set up, it is time to add some code. Plug-ins needs to have either a main class defined or a main nib defined. It is this definition that helps determine how to launch the bundle. In our case, we will want to define a main class which will be explained below. To define a main class (or nib), we need to look at the properties tab of the target.
The next step is to create the main class for our plug-ins. Since we are using a base class design for our plug-ins, our main class must extend the AbstractPlugin class and it needs to import the framework directly in the header. For our example, our plug-ins is going to display a new window on the screen, therefore the header must also include a NSWindow attribute and since we want to programmatically close the window, a -closeWindow: IBAction.
#import
#import

@interface PluginMainClass : AbstractPlugin
{
  IBOutlet NSWindow *mainWindow;
}

- (IBAction)closeWindow:(id)sender;

@end
Note that we are importing the framework which contains the AbstractPlugin super class we built earlier.
Once we have the main class defined it is time to build the user interface to go along with this plug-ins. It is not a requirement that plug-ins have a user interface, they can be pure code instead. However for the sake of completeness, we are going to add one for this example.

The structure of the plug-ins nib is simple. The file owner is the PluginMainClass we wrote previously and there is one window which we bind to the file owner.
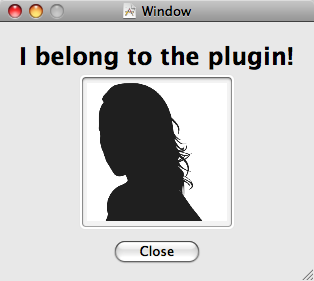
The window is also equally simple, just one button that binds back to the file owner’s -closeWindow: method.
The last step is to add a copy phase to our application. Like the framework copy phase we built last time, this is a “Copy Files” build phase and we need to configure it to copy files to the “PlugIns” directory. This is another top level directory next to Resources and Frameworks. Once the build phase is added, drag the plug-ins product into that build phase.
With the window and the main class built we can compile the plug-ins and make sure everything is ready for inclusion into our application. Once the app is built, we should see a copy of the plug-ins inside of the application bundle. Now it is time to dynamically load the bundle.
The flow of loading bundles dynamically is as follows:
- Find the paths of the bundles.
- Instantiate NSBundle objects for the paths.
- Execute the -load method on the bundle.
- Retrieve the principal class from the bundle.
- Instantiate an object from the principal class.
And the code for this is as follows:
- (NSArray*)loadPlugins
{
  NSBundle *main = [NSBundle mainBundle];
  NSArray *all = [main pathsForResourcesOfType:@"bundle"
                                   inDirectory:@"../PlugIns"]];

  NSMutableArray *availablePlugins = [NSMutableArray array];

  id plugin = nil;
  NSBundle *pluginBundle = nil;

  for (NSString *path in all) {
    pluginBundle = [NSBundle bundleWithPath:path];
    [pluginBundle load];

    Class prinClass = [pluginBundle principalClass];
    if (![prinClass isSubclassOfClass:[AbstractPlugin class]]) {
      continue;
    }

    plugin = [[prinClass alloc] init];
    [availablePlugins addObject:plugin];
    [plugin release], plugin = nil;
    pluginBundle = nil;
  }
  return availablePlugins;
}
In this new method that we have added to the AppDelegate we first get a reference to the main bundle and we then request a path for every file in the PlugIns directory that has an extension of bundle. With that array in hand we then start to loop over the array and construct a new NSBundle for each path. Once the bundle is constructed we ask for it to load. After the load, we grab its principal class, check to make sure we can use it, and construct an object from it.
Since we want to have a list of the loaded plug-ins, we throw this new object into an array that will be returned back from the method. Once this method is complete we now have every plug-ins dynamically loaded and ready to use. So lets use them!
We really want to call this method before the application has finished loading, therefore we need to add an -init method to our AppDelegate and load the plug-ins there. This will guarantee that they are loaded before the UI with some obvious benefits.
- (id)init
{
  if (![super init]) return nil;

  [self setPlugins:[self loadPlugins]];

  return self;
}
Here are we calling our new -loadPlugins method and setting the returned array into a ivar. This ivar will then be used by our UI once it loads to display a list of the plug-ins.
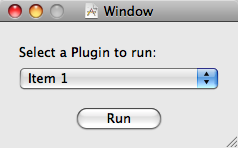
The main window has a pop up button with a list of the plug-ins using their inherited -name method for display. When the run button is clicked, our application will find out which plug-ins were selected via the NSArrayController and call the inherited -run: method on the plug-ins with predictable results.
Conclusion
For clarity we did leave a few things out of this project. For example, there is no code for unloading the plug-ins nor do we search the Application Support directory for user added plug-ins. However these are easy to add based on the code that was included.
I should also note that we used the default extension for these plug-ins. I would recommend changing this extension to something unique to your application and add that extension (or UTI) to your main application as an accepted file type. See previous articles here on CIMGF to see how to do each of those.

Example Project
A couple of points to keep in mind.
1. The term on Mac OS X is “plug-in” with a hyphen, capitalized as “Plug-in” and inter-capped in APIs as “PlugIn”. cf. Apple Publications Style Guide, the old CFPlugIn API documentation, the “Plug-ins” section of the Get Info panel in the Finder, and the Contents/PlugIns directory of the application you’ve embedded a plug-in within.
2. A plug-in **doesn’t** need to have a main class or nib defined. It could supply some other metadata, for example via its Info.plist file, or via subclassing of known classes, that the host application could use to locate appropriate plug-in facilities.
3. Don’t use -[NSBundle pathsForResourcesOfType:directory:] to locate embedded plug-ins, just look for packages with an appropriate extension in [[NSBundle mainBundle] builtInPlugInsPath].
4. Don’t use “bundle” or “plugin” as your plug-in path extension; use something unique to your application. After all, your application can’t load just any plug-in, and other apps can’t necessarily load yours.
5. On Leopard, use -[NSBundle loadAndReturnError:] to load plug-ins. This will tell you why a plug-in failed to load; for example, it may not have been compiled for your current architecture or with the right garbage collection flags. You can use -preflightAndReturnError: and -executableArchitectures to check basic things like architecture match in advance of loading.
6. Unloading plug-ins that use Cocoa is very hard, and may not necessarily be feasible. For example, you would need to guarantee that all literal NSString instances that came from a loaded plug-in were no longer in use. Similarly, any caches that may be maintained on a per-class basis may need to be cleared, including those within Cocoa. Depending on what your plug-in does, it may not be able possible to unload.
7. Finally, if you’re building a plug-in API, don’t just look in your application’s embedded plug-ins folder, look in its Application Support folder in all available domains as well. Your users shouldn’t be putting extra plug-ins inside your application; they’ll get lost when you do a Sparkle update, for example.
7.1. Also for development purposes it can be useful to tell your application an additional path or set of paths to load plug-ins from via a user default. This should usually be searched _before_ your standard set of paths, because then you can find the in-development version of a plug-in you’re working on in Xcode and use it in favor of the release version installed on your system.
Hi, I am newbie cocoa programmer. I had a problem hope you can help me.
Is it possible bundle a Flash-swf file use the same way as your tutorial said?
Thank you.
Ryan,
You probably can but it is most likely overkill. You can just embed the file in your application bundle and then find it with a call to
-pathForResouce:ofType:.Note that this will only work on the desktop because flash is not available on iOS.