Core Animation Tutorial: Slider Based Layer Rotation
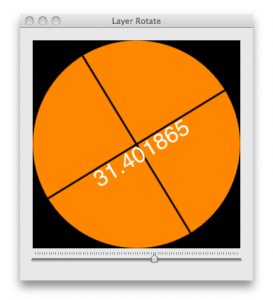
It is often helpful to create a custom control for you application that will display a value as a level like a gas gauge shows how full your tank is. In this post I will demonstrate how to create a three layer tree that will show the current rotation of a circular layer as the value from a slider (NSSlider) is updated in real time. The layers include the root layer, the rotation layer, and a text layer that will display the current rotation in degrees.
The Slider Value
We connect a slider to an IBAction in xcode that will get called continuously as we have checked the checkbox called ‘Continuous’ in Interface Builder. We can read the slider value and apply it to our animation that we use to rotate the layer. In interface builder, we have specified a minimum value of -180, a maximum value of 180 and a current value (our starting value) of 0 on the slide control. When the slider is moved, the rotation updates as does the value of our text layer.
While it is coincidental that the demo application sort of looks like a pumpkin, it seems appropriate considering the time of year.
Rotation Animation
Rotating a layer is very simple. You just need to create an animation with “transform.rotation.z” as your keypath and then you can set from and to values that the animation will rotate between. We simply keep track of the last value we rotated (previousValue in the code) to and use this as our from value in the next change to the slider.
- (CAAnimation*)rotateAnimation;
{
  CABasicAnimation * animation;
  animation = [CABasicAnimation
               animationWithKeyPath:@"transform.rotation.z"];

  [animation setFromValue:DegreesToNumber(previousValue)];
  [animation setToValue:DegreesToNumber([slider floatValue])];

  [animation setRemovedOnCompletion:NO];
  [animation setFillMode:kCAFillModeForwards];

  previousValue = [slider floatValue];

  return animation;
}
When our -sliderChange function gets called when the user moves the slider, we add the animation to the layer again using the key “rotate”. This is done first in our -awakeFromNib call and then in the -sliderChange call.
- (IBAction)sliderChange:(id)sender;
{
  [degreesTextLayer setString:[NSString stringWithFormat:@"%f", [slider floatValue]]];
  [needleLayer addAnimation:[self rotateAnimation] forKey:@"rotate"];
  [needleLayer setNeedsDisplay];
}
You will notice that we call -setNeedsDisplay on the layer. This is necessary as we have implemented the delegate method -drawLayer:inContext. We use this method to draw the vertical and horizontal black lines that intersect in the center of the circle layer.
- (void)drawLayer:(CALayer *)layer inContext:(CGContextRef)context;
{
  if( layer == needleLayer )
  {
      CGMutablePathRef path = CGPathCreateMutable();

      CGPathMoveToPoint(path,NULL, [view bounds].size.width/2.0, 0.0);
      CGPathAddLineToPoint(path, NULL, [view bounds].size.width/2.0, [view bounds].size.height);

      CGPathMoveToPoint(path,NULL, 0.0, [view bounds].size.height/2.0);
      CGPathAddLineToPoint(path, NULL, [view bounds].size.width, [view bounds].size.height/2.0);

      CGColorRef black =
              CGColorCreateGenericRGB(0.0, 0.0, 0.0, 1.0);
      CGContextSetStrokeColorWithColor(context, black);
      CFRelease(black);

      CGContextBeginPath(context);
      CGContextAddPath(context, path);

      CGContextSetLineWidth(context, 3.0);

      CGContextStrokePath(context);

      CFRelease(path);

  }
}
Retaining The Rotation Position
There are two parameters of an animation that must be set otherwise the layer transform will just revert back to the original rotation. These two lines of code in our animation creation code ensure that what you see remains sticky when the value is changed.
[animation setRemovedOnCompletion:NO];
[animation setFillMode:kCAFillModeForwards];
Now, when the slider moves, the vertical and horizontal lines will stay in the correct rotation position. If you comment those two lines of code out in the demo project, you will see that while the rotation layer animates, it jumps right back to its original rotation as soon as the animation completes.
Conclusion
You will likely find many uses for this type of control. You could of course control the rotation based upon some other value or control other than a slider, but this code demonstrates how simple it is to rotate a layer based upon user input. Until next time.


Nice focused demo. One correction: -setNeedsDisplay is not necessary in -sliderChange:, only during initialization to draw it the first time. Unless the layer content actually changes, calling -setNeedsDisplay will only slow performance for more complex drawing.
Hi, I would like make same think to iphone but just a button selector.
Its possible?
TKS for help me