Core Animation Tutorial: Core Animation And Quartz Composer (QCCompositionLayer)
Last night at NSCoder night, Fraser Hess was asking question about being able to draw in a Quartz Composer View (QCView) about which none of the rest of us had any knowledge or experience. As I’ve been doing a lot with Core Animation lately, I asked him if it was possible to just make the view layer backed and start adding layers to it. Fraser hasn’t worked with Core Animation much yet, so he was unsure. The other three of us set to looking at docs and making demo apps. The race was on… Oh. It’s not a race? Sorry about that. I thought we were practicing for Iron Coder…
My first attempt to get a QCView working succeeded. I was able to display a Quartz Composition in a window, but then I decided to try to make the QCView layer-backed like this:
[[window contentView] setWantsLayer:YES];
[qcView setWantsLayer:YES];

CATextLayer *text = [CATextLayer layer];
[text setString:@"hello World"];
[text setFrame:NSRectToCGRect([qcView frame])];
[[qcView layer] addSublayer:text];
This code would allow the text layer to show up, however, the Quartz Composition was gone and all I got was a gray window with the “hello World” text on it.
Two Heads Better Than One
This is what I love about NSCoder Night. You get some Cocoa geeks together and the collective wisdom starts this synergy where we can bounce things off each other and a solution emerges.
Chad, in the mean time, had been searching the web for some examples and at about the time I started to wonder if there was a Core Animation specific layer for Quartz Compositions, he said, “QCCompositionLayer”. Marcus and I were both at that point thinking, “ah, I should have thought of that since there are Core Animation layers to do everything else media related.”
I then went to town slinging some code and here is what I came up with:
- (void)awakeFromNib;
{
  [[window contentView] setWantsLayer:YES];

  QCCompositionLayer *layer = [[QCCompositionLayer alloc]
            initWithFile:@"/Developer/Examples/Quartz Composer/Plugins/OpticalFlow/Teapotii.qtz"];

  [layer setFrame:NSRectToCGRect([[window contentView] frame])];

  CATextLayer *text = [CATextLayer layer];
  [text setString:@"hello World"];
  [text setFrame:NSRectToCGRect([[window contentView] frame])];
  [ayer addSublayer:text];

  [[[window contentView] layer] addSublayer:layer];
}
I got rid of the QCView altogether and just added the Quartz Composer layer to the sublayers of the window’s content view. The Quartz Composition in a QCCompositionLayer begins to play automatically, so really this code is all there is to it. And notice that the text overlay works as well. You could really add anything you wanted in a Core Animation layer at this point.
Your Own Composition
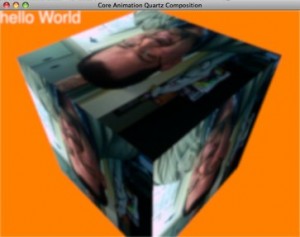
If you’re anything like me this will whet your appetite for playing with some very cool technology. I decided to create my own Quartz Composition and include that in the demo project. The demo composition takes the vide input of your iSight camera and applies the image to each side of a cube. It then rotates the cube. Creating the composition was pretty easy with a cursory reading of Apple’s Quartz Composer User Guide. It’s quite helpful.
You can take a look at the Quartz Composition in Quartz Composer. The demo application has two .qtz files in it. You can just double click either of those from the Finder to see what I did. The one I’m using in the demo app is the one called “VideoCub.qtz”. You can switch it in the code to see the other one as well, which is a quad of four iSight inputs.
You can see I added a CATextLayer to the QCCompositionLayer which displays the words, “hello World”. I also applied a Gaussian blur filter to the whole thing so you can see how easy it is to add filters as well. Here is *all* of the code needed to make this work.
- (void)awakeFromNib;
{
    [[window contentView] setWantsLayer:YES];

    NSString *path = [[NSBundle mainBundle]
                      pathForResource:@"VideoCube"
                      ofType:@"qtz"];

    QCCompositionLayer *layer =
        [[QCCompositionLayer alloc] initWithFile:path];

    [layer setFrame:NSRectToCGRect([[window contentView] frame])];

    CATextLayer *text = [CATextLayer layer];
    [text setString:@"hello World"];
    [text setFrame:NSRectToCGRect([[window contentView] frame])];
    [layer addSublayer:text];

    CIFilter *blurFilter =
    [CIFilter filterWithName:@"CIGaussianBlur"];

    [blurFilter setDefaults];
    [blurFilter setValue:[NSNumber numberWithFloat:2.0]
                  forKey:@"inputRadius"];
    [blurFilter setName:@"blur"];

    [layer setFilters:[NSArray arrayWithObject:blurFilter]];


    [[[window contentView] layer] addSublayer:layer];
}
What’s even more exciting to me is that if you know a bit of OpenGL, you can do all kinds of other manipulations of the image since QCCompositionLayer inherits from CAOpenGLLayer. Take a close look at -drawInCGLContext in the CAOpenGLLayer API docs. There is a ton of great potential there.
Conclusion
The conclusion is that Quartz Compositions are very cool and they are now even cooler since you can work with them in Core Animation. Take a look a the Quartz Composer guide and start building your own compositions that you can easily incorporate into your Core Animation based applications. Until next time.

Quartz Composition Layer Demo Project


