NSOperation Example
 Forget Mandelbrot sets (Apple coding headstarts) and Expression Trees. NSOperation is really not that hard.
In his post, Marcus introduced how to use NSOperation to greatly simplify multi-threading tasks in your application. I am now going to provide a step-by-step walk-through sample application that uses NSOperation, NSOperationQueue, and QTKit.
While looking around the Internet, I noticed that the only examples of using NSOperation available were related to scientific applications. I wanted something that I could relate to a little better and since I’ve been working with QTKit a lot lately, I figured it would be a good framework to build from. This application simply grabs images of a movie while it is playing back and saves them out to a file. It’s pretty simple, but it shows how to do something fairly practical.
Grabbing Movie Image Frames
The application displays a movie and provides a button for the user to click whenever the user wants to save the current frame of the movie to disk while it is playing. Here are some basic requirements I’ve given the app.
- Images are only saved when the movie is playing back
- Clicking the button and the subsequent saving of the current image must not cause the movie to flicker
- Clicking in rapid succession should not cause the application to crash. For each click, a new task (operation) should be generated
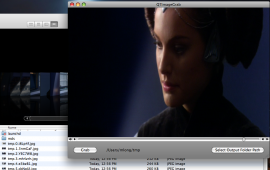
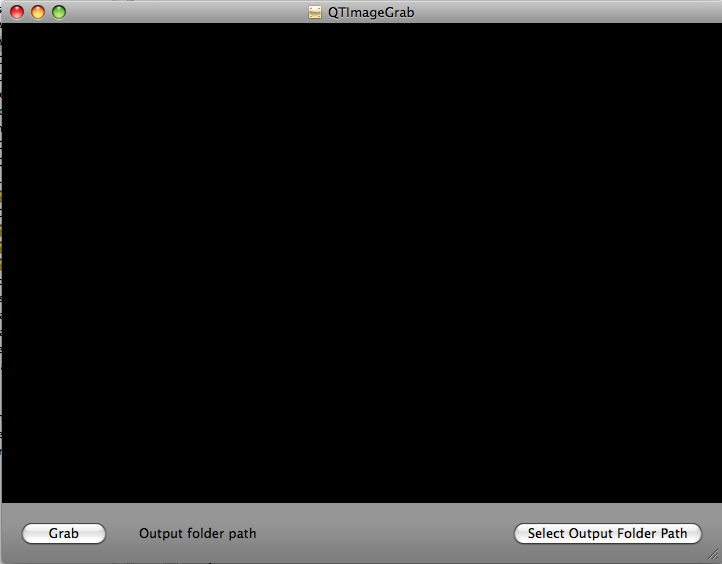
Here is a screenshot of the final application.

Follow along in XCode to create the application called QT Image Grab or download the sample project here.
Note If you are already comfortable with setting up an AppDelegate class and making connections in Interface Builder, you can jump down to the section titled Derive A Class From NSOperation
Create The Application
Create a Cocoa Application Using the following steps:
- Select File > New Project… and choose Cocoa Application in the ensuing dialog. Click Next
- Enter ‘QTImageGrab’ as the project name. Click Finish
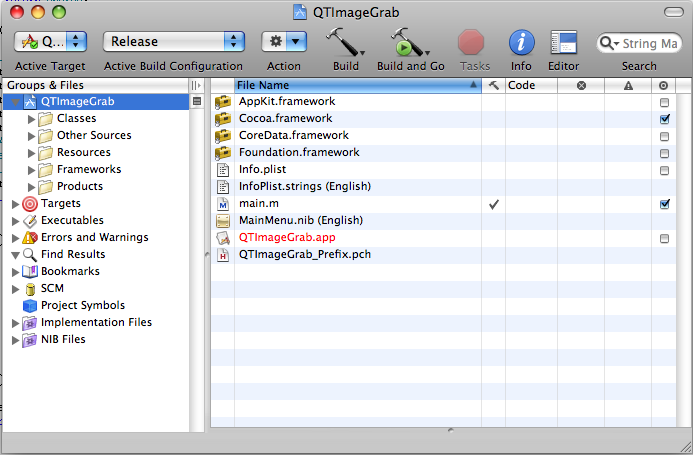
You should see a project workspace like the following:
Create A Controller/Delegate Class
The next thing you need to do is create an application controller, or delegate. To do so, use the following steps:
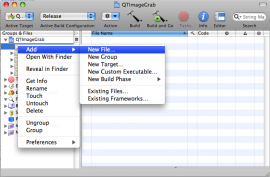
- Option-Click on the Classes folder in your workspace and select ‘Add File…’
- Choose Object-C Class in the ensuing dialog and click Next
- Name the file ‘AppDelegate.m’ and click Finish
- A new code window will display with your ‘AppDelegate’ interface code (.h file). Edit the code so that it looks like this:
#import
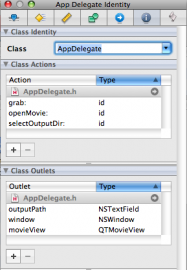
#import #import @interface AppDelegate : NSObject { IBOutlet QTMovieView *movieView; IBOutlet NSTextField *outputPath; IBOutlet NSWindow *window; NSOperationQueue *operationQueue; QTMovie *imagesMovie; } - (IBAction)grab:(id)sender; - (IBAction)openMovie:(id)sender; - (IBAction)selectOutputDir:(id)sender; @end - Now we need to add the QTKit framework to your project. Option-Click the Frameworks folder in your project and select Add > Existing Frameworks…
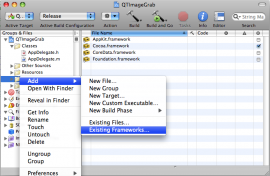
In the ensuing dialog, navigate to /System/Library/Frameworks and select QTKit.framework.
Click Add
- Now switch over to your implementation file for ‘AppDelegate’ (.m file). Add the implementation code so that the file looks like this:
@implementation AppDelegate

- (void)awakeFromNib;
{
    // We're going to add some initialization code here
}

- (IBAction)grab:(id)sender;
{
    // This is where will will start the process for grabbing the current image.

}

- (IBAction)openMovie:(id)sender;
{
    // Here we load our movie using an open panel dialog.

}

- (IBAction)selectOutputDir:(id)sender;
{
    // Here we will select an output directory where the current frame
    // image will be saved to.
}

- (void)dealloc;
{
    // We're going to have some cleanup to do.
}

@end
We will actually add some code to do something in each of these methods shortly, but first we need to hook it up to the user interface in Interface Builder.


Make The Interface Builder Connections
Now that we’ve specified all of our actions and outlets in the AppDelegate code, let’s make the connections in our NIB file. To do so, use the following steps.
- In the tree view of your project in XCode, expand the smart folder labeled NIB Files and double click the file called MainMenu.nib
Interface Builder will load the NIB file.
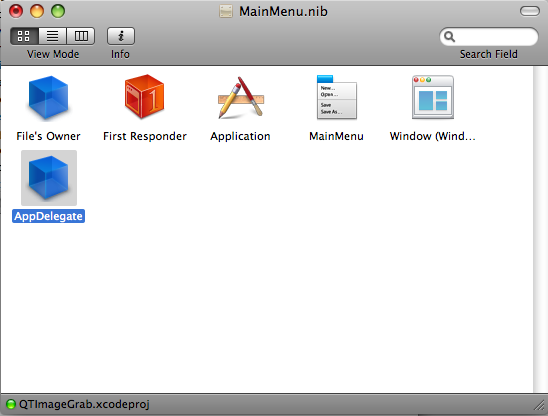
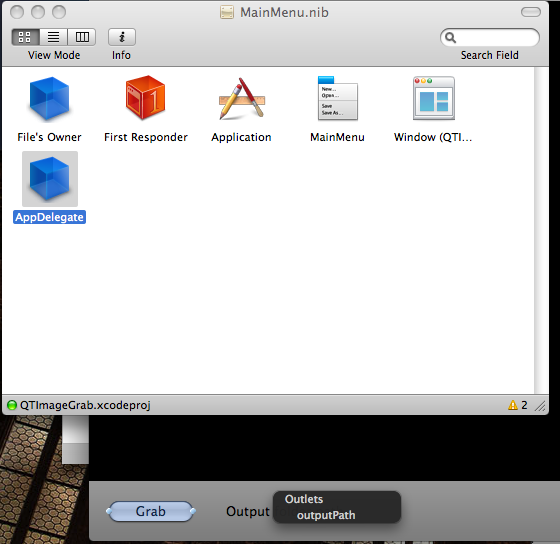
- In Interface Builder click and drag an NSObject from the Library palette into your NIB file and rename the object to AppDelegate as shown:

- With the AppDelegate selected, select Tools > Inspector from the menu bar. In the inspector, select the Object Identity tab (tab 6) and in the Class field, enter AppDelegate.
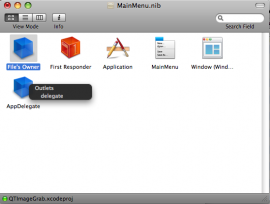
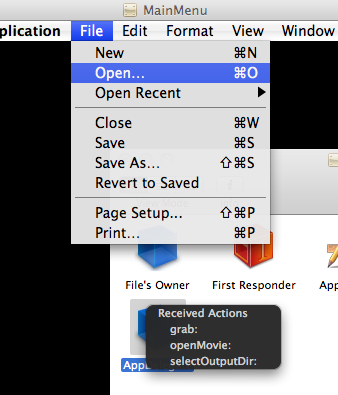
- Now we need to tell our application to use the AppDelegate object as its delegate. Control-Click on the File’s Owner object in the MainMenu.nib window and drag a connection to the AppDelegate object and select delegate in the ensuing pop-up menu.
- All we have left now is to drag the controls onto the window and connect the actions and outlets. Edit the main window dragging controls to it so as to make it look like this.
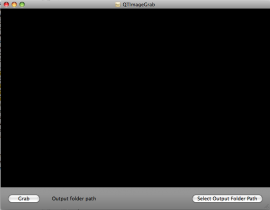
Note: The black area of the window is a QTMovieView which you’ll be able to find in the object library. It’s dimensions are set to a standard DV video format of 720 x 480 pixels.
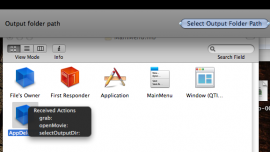
- Drag a connection (Control-Click) from the Grab button to the AppDelegate and select grab: from the dropdown.
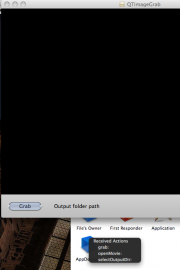
- Drag a connection from the File | Open… menu item to the AppDelegate and select openMovie: from the dropdown.

- Drag a connection from the Select Output Folder Path button to the AppDelegate and select selectOutputDir: from the dropdown.
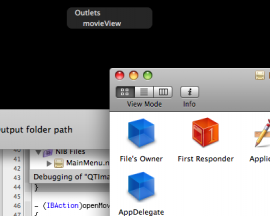
- Drag a connection from the AppDelegate object to the Output Folder Path text field and select the outputPath NSTextField from the dropdown.

- Drag a connection from the AppDelegate object to the QTMovieView and select movieView from the dropdown.


Now we are finished in Interface Builder. Let’s return to XCode and start populating our event handlers with code. Don’t forget to save your NIB file in Interface Builder.
Adding Event Handling Code
For most of our event handlers, you can simply copy and paste the code from this section as their use is simply to set up the application and not directly related to the use of NSOperation or NSOperationQueue.
– (void)awakeFromNib
- (void)awakeFromNib;
{
    // Initialize the queue
    operationQueue = [[NSOperationQueue alloc] init];
}
– (IBAction)selectOutputDir:(id)sender;
- (IBAction)selectOutputDir:(id)sender;
{
    NSOpenPanel *openPanel;

    openPanel = [NSOpenPanel openPanel];
    [openPanel setCanChooseDirectories:YES];
    [openPanel setAllowsMultipleSelection:NO];
    [openPanel setResolvesAliases:YES];
    [openPanel setCanChooseFiles:NO];

    if ([openPanel runModalForTypes:nil] == NSOKButton)
    {
        NSString *directory = [openPanel directory];
        [outputPath setStringValue:directory];
    }

}
– (void)dealloc
- (void)dealloc;
{
    [super dealloc];
    if( imagesMovie )
        [imagesMovie release];
}
There are two other event handlers that we need to fill in, but they will require a little bit of explanation, so first let’s go and create our NSOpeation derived class that will do all of the work we need.
Derive A Class From NSOperation
In our application, we want to get the current image of the movie while it is playing back and save it out to disk. This is the operation that we want our NSOoperation to complete in a separate thread. In order to do this, we need to create a new Objective-C class that derives from NSOperation. To do so, complete the following steps.
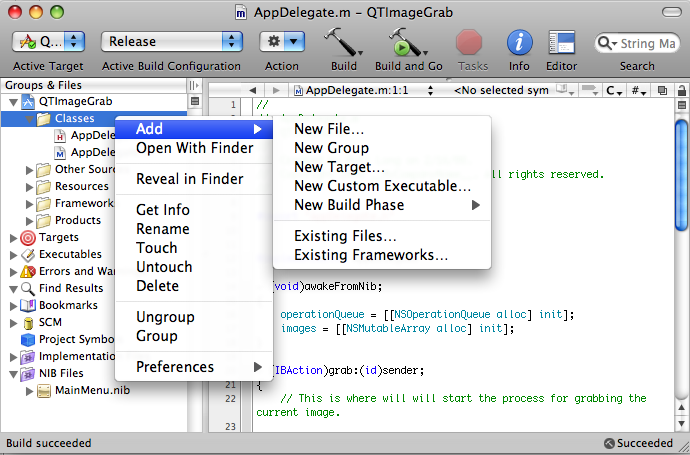
- In the XCode treeview, Option-Click the Classes folder and select Add | New File….
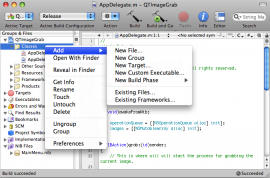
In the ensuing dialog, select Objective-C Class and click next. Enter the name ‘GragQTImageOperation.m’ making sure that Also create “GrabQTImageOperation.h” is checked and click Finish
- In the header file for the new Objective-C class you just created, change the interface so that our object inherits from NSOperation.
@interface GrabQTImageOperation : NSOperation {

}
Give Our NSOperation Something To Do
Our new class now needs some objects to work with and a method to do the work. To do work, an NSOperation derived class, must override the method called main:. Edit the file GrabQTImageOperation.m and provide the following function declaration.
- (void)main
{

}
In order to do the work, we need the following objects:
- QTMovie*: a pointer to a QTMovie view from which we will obtain our image to save.
- NSDictionary*: a dictionary to hold our attributes we will use when exporting to an image format
- NSLock*: a lock object to synchronize access to our QTMovie object.
- NSString*: a pointer to the output folder path we will use to save the files to.
- QTTime: a QTTime object representing the point in time as the movie was playing at which the grab button was clicked.
Change the GrabQTImageOperation header file to look like this.
#import
#import

@interface GrabQTImageOperation : NSOperation {
    QTMovie* movie;
    NSDictionary *imageAttrs;
    NSLock *lock;
    NSString *outputPath;
    QTTime time;

}

@property (assign) QTMovie *movie;
@property (assign) NSString *outputPath;
@property (assign) QTTime time;

- (void)main;
- (void)saveImage:(NSImage*)image;
@end
The method saveImage: actually saves the image to disk. Go ahead and add its declaration in the header as shown above. We’ll get back to that in a minute.
Implement main:
Now we need to switch to our implementation file (GrabQTImageOperation.m) and enter the following code into the main: function.
- (void)main
{
    if( movie )
    {
        NSImage* image;
        [lock lock];
        image = [movie frameImageAtTime:time withAttributes:imageAttrs error:nil];
        [lock unlock];
        [self saveImage:image];
    }
}
All we are doing at this point is getting the image at the specified time from our QTMovie reference and passing it on to our saveImage: method. Now fill we can populate the rest of the methods with the code we need to finish our NSOperation derived class.
– (id)init
- (id)init
{
    lock = [[NSLock alloc] init];
    // Specify that we want to save out a high-quality image.
    imageAttrs = [NSDictionary dictionaryWithObjectsAndKeys:
                       QTMovieFrameImageTypeNSImage, QTMovieFrameImageType,
                       [NSNumber numberWithBool:YES], QTMovieFrameImageHighQuality, nil];
    [imageAttrs retain];
    [super init];
    return self;
}
– (void)saveImage:(NSImage*)image
- (void)saveImage:(NSImage*)image;
{
    NSArray *representations;
    NSData *bitmapData;

    representations = [image representations];

    // Specify that we want to save the file as a JPG
    bitmapData = [NSBitmapImageRep representationOfImageRepsInArray:representations
                                usingType:NSJPEGFileType
                                properties:[NSDictionary dictionaryWithObject:[NSDecimalNumber numberWithFloat:1.0]
                                forKey:NSImageCompressionFactor]];

    // Creates a long filename, but at least it's unique.
    NSString *filename = [[NSProcessInfo processInfo] globallyUniqueString];
    filename = [filename stringByAppendingString:@".jpg"];
    NSString *imgOut = [outputPath stringByAppendingString:@"/"];
    imgOut = [imgOut stringByAppendingString:filename];
    [bitmapData writeToFile:imgOut  atomically:YES];
}
And finally, don’t forget to add our synthesize calls at the top of the implementation.
@implementation GrabQTImageOperation

@synthesize movie;
@synthesize time;
@synthesize images;
@synthesize outputPath;
...
Finish Implementing AppDelegate
Now that we’ve finished creating our NSOperation derived class, we can finish the implementation of our AppDelegate. First add the following code to the openMovie: event handler.
– (IBAction)openMovie:(id)sender
- (IBAction)openMovie:(id)sender;
{
    NSOpenPanel *openPanel;

    openPanel = [NSOpenPanel openPanel];
    [openPanel setCanChooseDirectories:NO];
    [openPanel setAllowsMultipleSelection:NO];
    [openPanel setResolvesAliases:YES];
    [openPanel setCanChooseFiles:YES];

    if ([openPanel runModalForTypes:nil] == NSOKButton)
    {
        NSArray *filesToOpen = [openPanel filenames];
        NSString *theFilePath = [filesToOpen objectAtIndex:0];
        QTMovie *movie = [QTMovie movieWithFile:theFilePath error:nil];
        imagesMovie = [QTMovie movieWithFile:theFilePath error:nil];
        [imagesMovie retain];
        [movieView setMovie:movie];
    }

}
Take note of these two lines:
QTMovie *movie = [QTMovie movieWithFile:theFilePath error:nil];
imagesMovie = [QTMovie movieWithFile:theFilePath error:nil];
Notice that we are loading the same movie into memory twice. The first is for the object called movie which will be used in our QTMovieView for actual movie playback. The other movie is an instance variable called imagesMovie which will act as a background movie. It will be passed to our NSOperation derived class and it is the object from which the images will be obtained for saving to disk.
We use two movie objects representing the same file on disk in order to satisfy one of our requirements which was to ensure that the movie doesn’t flicker or stutter when the operation is happening. One movie reference is for display, the other for processing.
And finally, we now need to populate our grab: method which initializes our NSOperation derived objects and passes them off to the NSOperationQueue which runs them immediately. First, we need to import our header file at the top of AppDelegate.h like this:
#import "GrabQTImageOperation.h"
And now, here is the implementation of grab: in AppDelegate.m.
- (IBAction)grab:(id)sender;
{
    NSString *path = [outputPath stringValue];
    if( !path || [path length] <= 0 )
    {
        NSAlert *alert = [NSAlert alertWithMessageText:@"Set Output Directory" defaultButton:@"OK" alternateButton:nil otherButton:nil informativeTextWithFormat:@"You must first select an output directory before grabbing images."];

        [alert beginSheetModalForWindow:window
            modalDelegate:self
            didEndSelector:nil
            contextInfo:NULL];

        return;
    }

    // Check to see if the movie is playing
    if( [[movieView movie] rate] > 0.0f )
    {
        // If so, create our NSOperation derived object and hand it off to the queue
        GrabQTImageOperation *op = [[GrabQTImageOperation alloc] init];
        [op setMovie:imagesMovie];
        [op setTime:[[movieView movie] currentTime]];
        [op setOutputPath:path];

        // As soon as this method finishes, the operation is set to work
        [operationQueue addOperation:op];
    }
}
The first thing we do is make sure our output path is set. If it is not, we alert the user and return. Otherwise, we check to see if our movie is playing by checking the movie’s current rate. If it is playing, then we are going to spin off one of our new GrabQTImageOperation objects to grab the image at the currentTime. Once we hand the image operation off to the NSOperationQueue we can watch the specified folder in the Finder and images will start to display.
To see the application run, click Build and Go
Conclusion
Developing with NSOperation and NSOperationQueue is a very pleasant experience to me so far. This was a fun application to build and the results are quite pleasing. I was able to achieve all of my project requirements with very little effort. It’s a great addition to the toolset now available in OS X 10.5 Leopard.
[…] Read the new article, NSOpeartion Example, here. […]
Thanks very much for this great example. I do have a couple of questions for you (though they are not related to NSOperation).
1) It looks like you’re creating a new lock for every NSOperation. If that’s the case, what exactly is the lock doing? If each thread has its own lock, then it seems the lock has no effect.
2) Is there a reason you’re not using the path-related NSString methods (e.g. stringByAppendingPathComponent) when constructing your image filename? It would seem that this would simplify things (rather than appending a / and then appending the filename, for instance).
Hey Chad,
Here’s my answers.
1. You’re right. It’s not used correctly there. Sorry about that. I could provide a lock that all NSOperations use since they are all going to be grabbing their images from the same QTMovie object, however, in this case the QTMovie data is never changing. All threads are only reading from it. It’s probably best to synchronize even when it’s only reads, however, I’m probably not going to fool with it for this example. ;-)
2. I guess the short answer is that I wasn’t familiar with it. But now I am. Thanks for that.
I’ll fix the code and the sample app as soon as I get a chance.
Best Regards.
-Matt
@implementation GrabQTImageOperation
@synthesize movie;
@synthesize time;
@synthesize images;
@synthesize outputPath;
Perhaps the synthesize-ation of images is wrong. It only compiles without it.
Daskaja,
Sorry about that. I missed that when I was cleaning up the code. It needs to be removed. Originally I was going to keep an NSArray of all of the images and save them out in a batch. Decided against that idea, but I guess I missed removing that line. Thanks and I’ll fix the project file ASAP.
-Matt
[…] Cocoa Is My Girlfriend » Blog Archive » NSOperation Example – Neat little sample that demonstrates multi-threaded programming in Cocoa using the NSOperation class […]
[…] my first post I wrote about using NSOperation to grab an image of the current frame of a QuickTime movie while it […]
Merry Christmas and Happy New Year
I’m learning to use Xcode, following the instructions,
I made a small player, as a first experience was very interesting, with satisfactory results.
I only have this one, I can not solve, given the lack of experience, I would like to bring up a Label (TextField) movie filename and the total time (duration) of the movie.
I looked at the manual and searched online, but I did not find acceptable solutions.
Have you any advice and / or solution on how to solve my problem.
My compliments for the article, having started just found it very good.
I thank you very much