Cocoa Touch Tutorial: iPhone Application Example
Similar to one of my first blog posts on building a basic application for Mac OS X using xcode 3.0, I am going to explain for beginning iPhone/iPod Touch developers how to build the most basic Cocoa Touch application using Interface Builder and an application delegate in xcode 3.1. This tutorial post is really to provide a quick how-to. I won’t go into any depth explaining why things are done the way they are done, but this should help you get up and running with your first application pretty quickly so that you too can clog the App Store with useless superfluous apps (kidding… just kidding).
If you are a visual learner, it may be helpful to you to instead watch a video presentation of this tutorial. I’ve posted it on the site, but you’ll have to click the link to see my Cocoa Touch Video Tutorial.
Understanding Cocoa programming is much simpler if you learn MVC, Model, View, Controller. You can probably step through code examples and figure some things out without learning MVC, but I wouldn’t recommend it. Go Google it and read up on it.
I will say as an introduction to MVC for those who are not familiar that it should probably be called (Model <--> Controller <--> View) or (View <--> Controller <--> Model) as the controller always sits between the other two. Your controller is either telling your model to update its data or it is telling the view to update its display. That’s the crux of the whole paradigm. The details run much deeper, but that’s how I will nutshell it for you.
Create Your Application
Let’s get started. Create a Cocoa Application using the following steps:
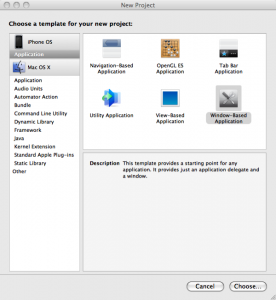
- Select File > New Project…, under the iPhone OS templates choose Window-Based Application in the ensuing dialog. Click Choose…
- Enter ‘Basic iPhone App’ as the project name. Click Save
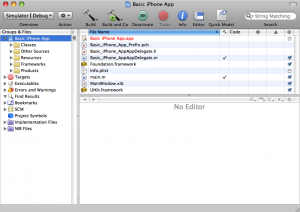
You should see a project workspace like the following:
The next thing you should do is create a class to act as your controller or delegate.
Delegate == Controller
The words delegate and controller can be used synonymously. You’ll see later that we delegate the work of the different controls we create in Interface Builder to a delegate or controller class. In the iPhone template projects, this application delegate is created for you. Our app delegate has been named Basic_iPhone_AppAppDelegate.
In our app delegate class we need to add what Cocoa developers refer to as outlets and actions. I could spend an entire post explaining these two things in depth, but for the sake of brevity and walking you through the steps to build your first application, the definition will have to suffice.
Outlets represent controls in your user interface that can have some action performed upon them. Action are functions in your code that are connected to controls in your user interface such as a button or a drop down list. When connected to a button for instance, the action code will be run when the user clicks the button.
In xcode, open your app delegate header file Basic_iPhone_AppAppDelegate.h. Add an outlet for the text field and the label below the window outlet as in the following snippet:
@interface Basic_iPhone_AppAppDelegate : NSObject  {
    IBOutlet UIWindow *window;
    IBOutlet UITextField *textField;
    IBOutlet UILabel *label;
}
You will also want to add an action that will be performed when our button is clicked. Add that below the property for our window:
@interface Basic_iPhone_AppAppDelegate : NSObject  {
    IBOutlet UIWindow *window;
    IBOutlet UITextField *textField;
    IBOutlet UILabel *label;
}

@property (nonatomic, retain) UIWindow *window;

- (IBAction)click:(id)sender;
- (void)applicationDidFinishLaunching:(UIApplication *)application {

    // Override point for customization after app launch
    [window makeKeyAndVisible];
}

- (IBAction)click:(id)sender;
{

}
We will actually add some code to do something in the click: action handler, but first we need to hook it up to the user interface in Interface Builder.
Interface Builder And Controller/Delegate Implementation
Now that you’ve specified the outlets–a UITextField and a UILabel and an action called click:, you will see these items available for connecting to the UI in Interface builder. Let’s open Interface Builder and make the connections we need using the following steps:
- In your xcode workspace, expand the folder in the tree view called Resources and double click the file called ‘MainMenu.xib’.
Note:: A .xib is a .nib that uses XML for the internal data structure.
This will open the xib file in Interface Builder
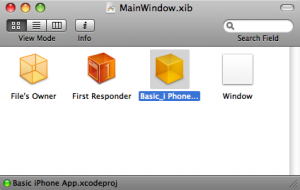
- Once Interface Builder loads, you will notice that there is an object representation of our app delegate in the MainWindow.xib window. This is the object you will use to create connections for your actions and outlets.
Design The User Interface
Now you need to add the controls to the main window in Interface Builder and then we can connect the action and outlet accordingly. To finish the interface, complete the following steps:
- Make sure that the Object Library is open by selecting Tools | Library from the menu in Interface Builder.
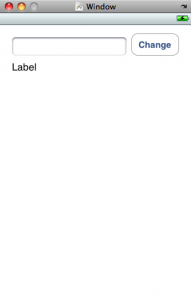
- Drag a TextField, a Label, and a Button to the main window so that the user interface looks like the screenshot below:
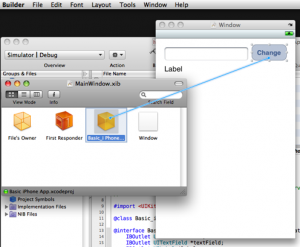
- Control-Click and drag from the Button to your app delegate object in the ‘MainWindow.xib’ window.
A pop-up will display. Select click:
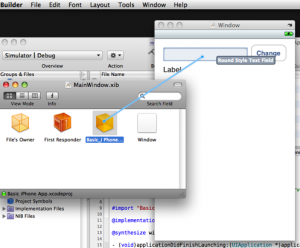
- Control-Click the app delegate object and drag it to the text field in the main window.
A pop-up will display. Select textField
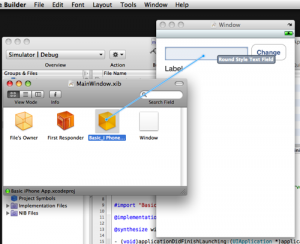
- Control-Click the app delegate object and drag it to the label in the main window.
A pop-up will display. Select label
That’s it for Interface Builder. You can quit interface builder and return to xcode. We have one more piece of code to add and then our application will be finished.
Finishing Up
When the button is clicked, it will simply grab the text from the text field and place it into the label. That’s all the application does. Here’s the code you need. Just make your implementation of the click: action in the Basic_iPhone_AppAppDelegate.m file look like this:
- (IBAction)click:(id)sender;
{
    [label setText:[textField text]];
}
Notice we are grabbing the text from the text field, and setting the text in our label with it. Now all you need to do is click “Build and Go”. When the application runs the iPhone Simulator will be started. You will see the application load. Type some text into the text field and click the Change button. You will see the label update with the text from the text field.
Next Steps
This tutorial has just scratched the surface. It’s is intended to get you going quickly. For a more in-depth path to gaining a deeper understanding of iPhone development, take a look at Apple’s, Your First iPhone Application. You will need to log in with your ADC account to see the article, but it is definitely worth while.
Conclusion
The limit with iPhone development is really just your imagination. It is an extremely fun platform to develop on and the resulting applications are very rewarding. Have fun with it and learn as much as you can. Just do me a favor and don’t clog the App Store with any more flashlight apps or tip calculators… Seriously ;-) . Until next time.

Basic iPhone Application Demo Project

Awesome thanks! Keep em coming :) Also thanks for the video tutorial.
Thanks again!
Titus
Cocoa Touch SDK Tutorial: iPhone Application Example…
I am going to explain for beginning iPhone/iPod Touch developers how to build the most basic Cocoa Touch application using Interface Builder and an application delegate in xcode 3.1. This tutorial post is really to provide a quick how-to….
Nice Tutorial. But how do you add the ability to Hide the keyboard when empty area is touched ?
Also, making the Submit button on the keyboard act as the Change button would be nice….
Pls reply to the comment with the solution or post a Tutorial for it. Thanks a lot.
Cocoa Is My Girlfriend…
Cocoa Is My Girlfriend is a blog about programming and a passion for programming on the Macintosh. A lot of good Cocoa tutorials. One new post is a Cocoa Touch tutorial:
Taglines are for Windows programmers
Cocoa Touch Tutorial: iPhone Application Exa…
Thanks for you tutorial, it’s very good.
Recomiendo este post
Regards
Awesome, thanks.
Dude, this is by far the best tutorial I’ve found yet! Talk about a *doh* moment when I realized you had to Ctrl-click using the MainWindow.xib!
Thanks a million and keep em coming!
Matt
I just downloaded the SDK today. I don’t know if there are changes, or differences in settings, but I had to use the following code in Basic_iPhone_AppAppDelegate.h to get it to work.
@interface Basic_Iphone_AppAppDelegate : NSObject {
UIWindow *window;
UITextField *textField;
UILabel *label;
}
@property (nonatomic, retain) IBOutlet UIWindow *window;
@property (nonatomic, retain) IBOutlet UITextField *textField;
@property (nonatomic, retain) IBOutlet UILabel *label;
I understand the IBOutlet in the snippet is supposed to handle this, but for some reason it wasn’t working. Doing it this way worked.
[…] Very good intro to the platform. […]
[…] Cocoa Touch Tutorial: iPhone Application Example […]
[…] Cocoa Touch Tutorial: iPhone Application Example […]
[…] 译者注:好久没有翻译了,好久没有看到这么通俗易懂的教程了,也好久没有更新Blog了。译文ä¸æˆ‘ä¿®æ£äº†ä¸€äº›åŽŸæ–‡ä¸é”™è¯¯çš„è¯å¥å’Œå›¾ç‰‡ï¼Œå¦‚果想看原文,请点击这里。若å‘现任何翻译错误,欢迎在文末留言。 […]
Hi Matt Long,
I have translated this tutorial into Chinese (link).
This is really a awesome tutorial:)
All the best,
Liu Shen
[…] Cocoa is my girlfriend […]
Sorry, but this seems to do less and explain less than the “Your First iPhone Application” tutorial on the iPhone Dev Center site — which also explains how to dismiss the keyboard…
@mmalc
Hadn’t even seen that tutorial before writing this. Though, for people who are completely new to the whole IB actions/outlets, etc. this tutorial cuts to the chase–which was my goal. This isn’t for a seasoned Cocoa developer such as yourself. ;-) I think I’ll link to that other one though as ‘next steps’. Thanks for pointing it out.
Thanks for the feedback.
-Matt
Great tutorial!! I was able to follow the video perfectly, and I feel like I’m on my way to making an iPhone app already.
Q: Do you know why a UIImageView set up in IB fails to appear when running the simulator? (“Hidden” is unchecked.) I’ve searched high and low and haven’t found an answer to this — you seem like a guy who would know!
Thanks,
Darel
[…] Cocoa Touch iPhone-Tutorial Der ehemalige Windows-Programmierer Matt Long stellte eines der beliebtesten iPhone Tutorials ins Netz. […]
[…] Cocoa Touch Tutorial für angehende iPhone-Entwickler. In 7 Schritten erklärt cimgf.com den schnellen Weg zur ersten eigenen iPhone-Applikation und gibt Einsteiger-Tipps für […]
Matt – Just a quick correction. The image where you want to show connecting delegate->label actually shows delegate->textField a second time. Copy-paste error? ;-)
[…] Cocoa Touch Tutorial: iPhone Application Example […]
[…] Cocoa Is My Girlfriend » Cocoa Touch Tutorial: iPhone Application Example […]
[…] Cocoa Touch Tutorial: iPhone Application Example A very nice tutorial from Matt Long on creating your first iPhone application using Interface Builder. […]
Nice focused tutorial. Thanks!
@interface Basic_AppAppDelegate : NSObject had me stumped until I read an explanation at:
http://forums.tigsource.com/index.php?topic=3641.0
that should read
@interface Basic_AppAppDelegate : NSObject \
The bit that stumped me for a good while was in the ‘Design the User Interface’ where you say ‘simply… drag a text field’… This didn’t mean much until I opened ‘Library’ from the Tools menu in the Interface builder. So I thought it may help other tyros if I commented.
Brillant Blog. Thank you…
@john.buckingham Good call. I’ve added that as a step in the UI design part of the tutorial. Thanks for the feedback. That’s helpful.
-Matt
My primary work is not in IT but sometimes when I go on vacation I will write a little program, usually for a new device I’ve bought. Off course when I go on vacation I’m usually off the grid enough so that I don’t have access to fast downloads, etc. This time I had fast enough access to download megabytes of web pages or PDF’s but not the full 1.7 GB iPhone SDK. I just got back from vacation and reinstalled the iPhone SDK. The thing is when I start up XCode I don’t see the list of application types (ie. Window-based) you show. I don’t see the iPhone as an available SDK under the project menu. So it isn’t that I neglected to install what tools I needed before I left. I’ve reinstalled them and they aren’t where the tutorial implies they should be. Anyway, vacation’s over I’m frustrated butthere’s little help anyone can give me because my opportunity is GONE.
very goo…I have one problem. On the control click drag part of the making of the app. I can not drag t to the textbox, label, and button. It only lets me outpt drag to the whole entire window…please help me or email me at jeszlinger@lycos.com
Thanks for the tutorial! I found it very helpful and clear. I decided to expand on your example a bit by making the text box into a site search. It replaces the Label with a UIWebView and builds a very simple results page:
http://www.hawkee.com/snippet/5833/
Really good job! Thanks man,….
[…] Cocoa Touch Tutorial: iPhone Application Example: This tutorial will show you how to make a very basic Cocoa Touch application with Interface Builder. [Cocoa Is My Girlfriend] […]
[…] Cocoa Anyone? […]
[…] it’s worth checking out what iPhone and Android development looks like. Check out this simple iPhone application development example to get a taste of what iPhone developers do. Android apps are written in Java, and here’s a […]
Thank you this is fantastic, I’ve read several books from pages 1-350, and all I needed was this brilliant concise, clear explanation. Without blinding me with the science, you have complied a clear demonstration on your video and all I can say is, AWESOME! I really want Cocoa to be my boyfriend…..But I need to understand him first…..Do you have any more tutorial or samples i.e. how to include the fundamental codes like scrolling, keyboard bounce back, memory codes and so forth? Be grateful for some resources, tips etc….THANK YOU!
[…] Cocoa Touch Tutorial: iPhone Application Example This tutorial covers how to develop Cocoa iPhone apps using Interface Builder to quickly build your first application. […]
[…] I got a very simple iPhone application to work, and since I couldn’t find this very basic kind of tutorial on the web, thought I’d contribute. This is a riff of a great blog post- from Cocoa is my Girlfriend, “Cocoa Touch Tutorial iPhone Application“. […]
[…] Cocoa Touch tutorial: iPhone Application Example I love this simple explanation of interactivity using Interface Builder, great screen shots too. […]
[…] Cocoa Touch Tutorial: iPhone Application Example: This tutorial will show you how to make a very basic Cocoa Touch application with Interface Builder. [Cocoa Is My Girlfriend] […]
[…] far as creating your own app, read this article: http://www.cimgf.com/2008/10/01/cocoa-touch-tutorial-iphone-application-example/. It will give you some of the […]
[…] Noch einfacher: http://www.cimgf.com/2008/10/01/cocoa-touch-tutorial-iphone-application-example/ […]
[…] Link […]
i would like to know if anyone can teack me how to build an app that with a press of a button it reads in a database and display a random word i have inserted in that database on my interface
Let’s say i put
Andrea
John
Michael
in my database ad if i press the button it shows randomly one of the 3….also what kind of database would i better use?
Thanks in advance.
Keep in mind i am a complete newbie so a spet by step guide would be awesome (if honest i can pay a small ammount for the tutorial :)
Thanks
Andrea
Andrea,
What you are asking for would require more than a step by step tutorial. You really have to get down to basics of programming first and then step up from there. Creating an application that does what you are asking it fairly trivial to a seasoned programmer, but if you’ve never written code before, you’re going to have to crawl before you walk. In other words a step-by-step tutorial for what you are looking for exactly won’t help you unless you understand what each step means.
Here are a couple pointers. Learn to write iPhone apps first from Aaron Hillegass. Then you should look into Core Data for storage. It would be perfect for what you are wanting to do.
Best regards,
-Matt
Great tutorial, easy to follow up and most of all, it works. Nicely explained. Keep up the good work :)
Regards,
Kamil
this is a great tutorial. I understood the concept of iphone app development here better than any other website. I am very new to this and i need a little guidance on developing a very simple app. This app has sliders only. I have built the interface but have no idea where to start with for the coding.
I want to tie up one or more sliders. So if i move one slider the other moves accordingly. Each slider has a different range. This sort of a calculator i am trying to create. I would appreicate if you could guide me as to where to begin.
Mohit
[…] Tutorial iPhone App Development […]
[…] your own iPhone app iPhone and iPad Development GUI Kits, Stencils and Icons Building iPad apps Create your application Keywords: objective-C, Resources, […]
[…] Cocoa Touch Tutorial: iPhone Application Example: This tutorial will show you how to make a very basic Cocoa Touch application with Interface Builder. [Cocoa Is My Girlfriend] […]
[…] Cocoa Touch Tutorial: iPhone Application Example: This tutorial will show you how to make a very basic Cocoa Touch application with Interface Builder. [Cocoa Is My Girlfriend] […]
helpful post, keep posting on
Cocoa Touch & Xcode
codefrux
http://www.codefrux.com
[…] Cocoa Touch Tutorial: iPhone Application Example – Explaining for beginning iPhone/iPod Touch developers how to build the most basic Cocoa Touch application using Interface Builder and an application delegate in xcode 3.1 […]
[…] the label onto the main screen of the iphone and more. It’s about a 16 minute tutorial. Cocoa Touch Tutorial: iPhone Application Example – Explaining for beginning iPhone/iPod Touch developers how to build the most basic Cocoa […]
This is an awesome tutorial. I read so many blogs to get started but all of them lacked proper explanation.. this one really cleared all my doubts..