Using GIT In Xcode
Git has become a very popular version control system in iOS and Mac development. Git comes with a set of command line tools to check status, commit changes, view logs, make and merge branches, and coordinate commits with a remote repository. There are a number of desktop apps that can perform these functions, including Xcode. When I ask other iOS and Mac developers how they interact with Git, most say they use the command line or a separate desktop app like Tower. I find very few developers use Xcode for even some basic Git tasks, and many developers are not aware of the Git support Xcode offers.
For my own workflow, I like to minimize the number of tools used and number of switches between apps needed to complete a task. So, I decided to attempt to use Xcode exclusively to interact with Git and share my results. So far I have been pleasantly surprised at what all Xcode can do with Git. If you have not taken a look at Xcode’s support for Git, you may be surprised how much you can accomplish.
This article assumes basic familiarity with Xcode and Git, and describes Git functionality present in Xcode version 4.6.2.
NEW GIT PROJECT SETUP IN XCODE
Since Git is a distributed version control system, a repository can be created locally when starting a project, or on a remote server and then cloned. Xcode can handle both situations.
When creating a new Xcode project, you can include a local git repository by checking the “Create local git repository for this project” option. Xcode will initialize the repository and perform an initial commit with the template files for you.

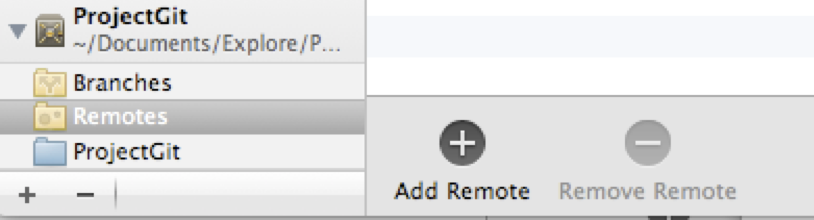
If you are sharing your project with a team or just want a backup of your project on another machine, you can set up a remote copy of the repository. The typical way this is done is to create an empty repository on a git service like GitHub or Bitbucket. Once the repository is available, return to Xcode and open the Organizer. Select Repositories to view all the version control repositories that Xcode is aware of, and find the new project repository. Select Remotes for the new project, add then click the Add Remote button.
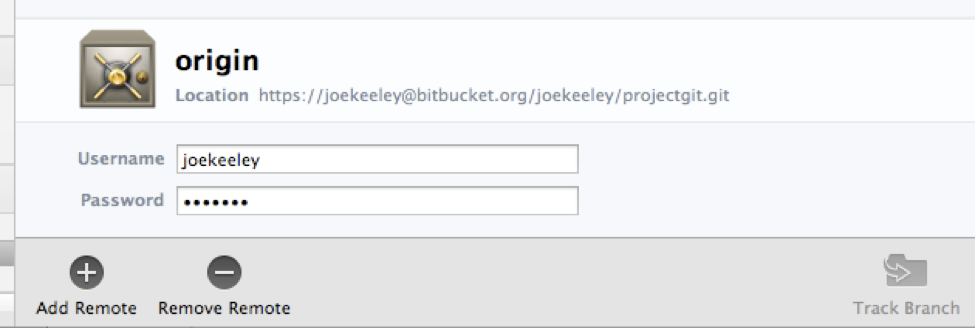
Xcode will present a dialog to add the remote. You can follow the default naming standard for a git remote and give it the name “origin”, or you use a custom name. Then specify the remote URL for the repository, which will be provided by Bitbucket.

If the remote repository is private and requires authentication, you can enter it after the remote is added. Select the remote in the Organizer list, and an authentication interface will appear below the list.
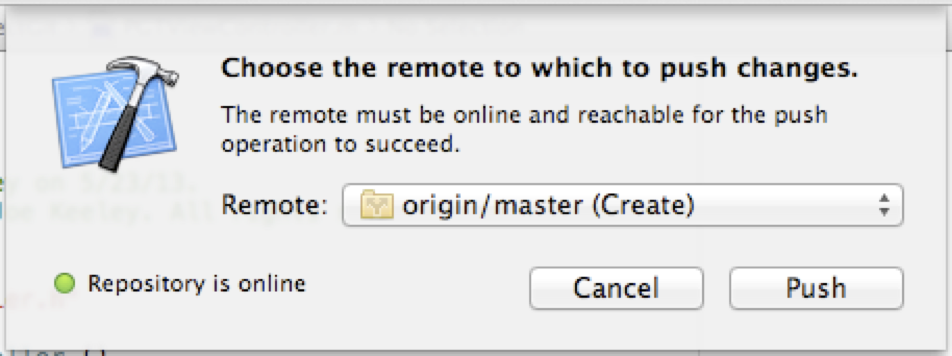
Once the remote is added and authentication provided, the master branch needs to be pushed to it. Return to the Xcode project window. From the Xcode menu, select File | Source Code | Push… Xcode will present a sheet which will allow you to select a remote to push to, and a branch to push. Note that Xcode has checked with the remote repository, and indicates that the master branch will be created in the remote repository with the push.
Once the push is complete, the remote repository is available for updates and for other users.
USING AN EXISTING REMOTE PROJECT IN XCODE
To clone a copy of an existing remote repository, open the Organizer in Xcode and select Repositories. Click the plus (“+”) button in the lower left hand corner of the Organizer, and select “Checkout or Clone Repository…”.

Xcode will present a dialog requesting a URL or file path. Xcode can handle both ssh and https URLs for git repositories. Be sure to specify the full URL for the repository, which is typically available on the project page for Github or Bitbucket.
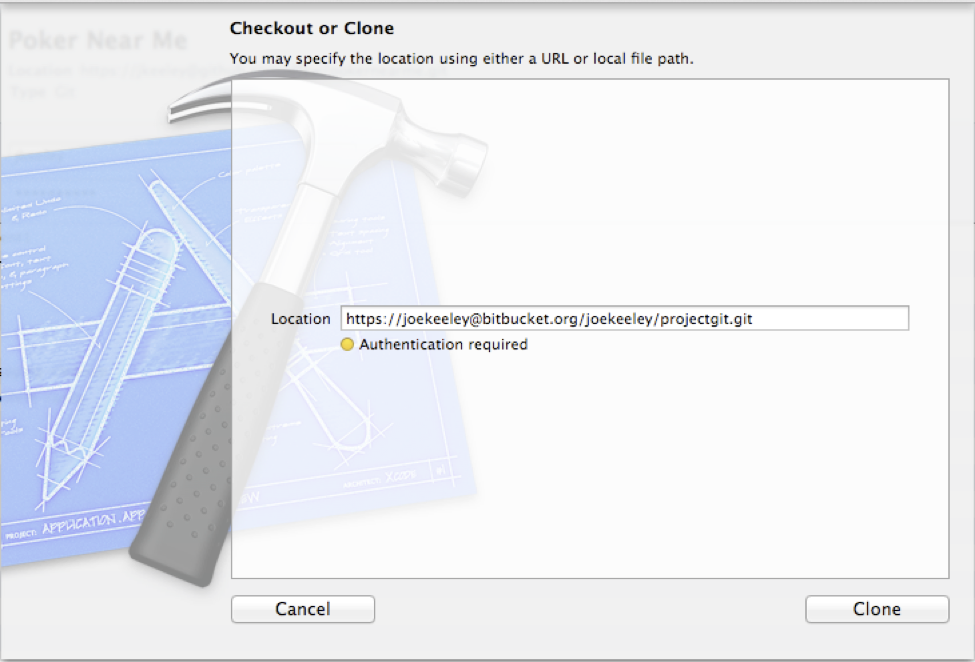
If the repository is private and requires authentication, Xcode will request your credentials for the repository.

Provide your credentials and click OK. Xcode will store your credentials in the keychain for subsequent accesses of the remote repository. Note that Xcode can also handle ssh key authentication in addition to name and password. Once Xcode has authenticated with the remote repository, Xcode will request a location to store the project, and then project will be cloned. Once cloned the project can be opened or shown in the finder.
If you run into an issue with using the Checkout or Clone approach and authentication, Select “Add Repository…” instead. You can then add your authentication information for the repository, and clone from there. This approach worked for me in cases where using Checkout or Clone did not.
When the clone is complete, the local working copy is ready for updates.
MAKING AND COMMITTING CHANGES
Once you have a working copy of your project, it’s time to get to work. As you make changes to the project, Xcode will indicate when files have been changed from the working copy.

An “M” next to a file indicates it has been modified, and an “A” indicates the file is new to the repository.
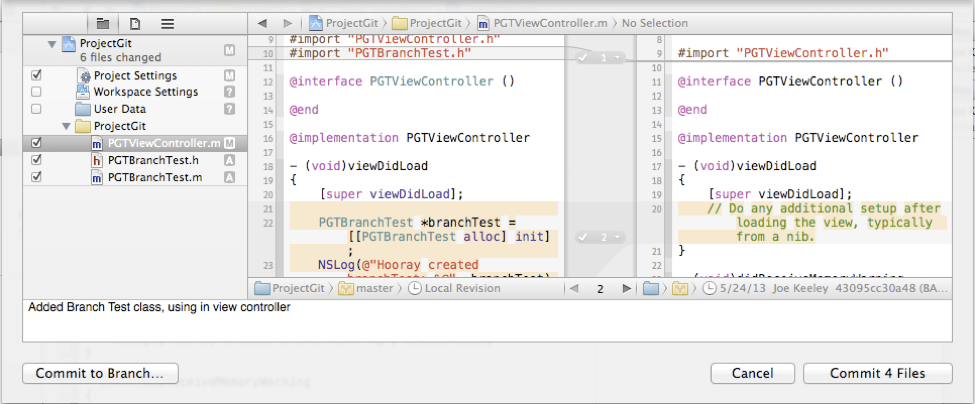
To commit changes, select File | Source Control | Commit from the Xcode menu. Xcode will display all the differences from the working copy in the commit view. If you only want to commit some of the changes, you can check or uncheck files as desired to include or exclude them from the commit. In addition, you can select only the files you want to commit before selecting File | Source Control | Commit from the Xcode menu, and only the files you have selected will be displayed in the commit view.
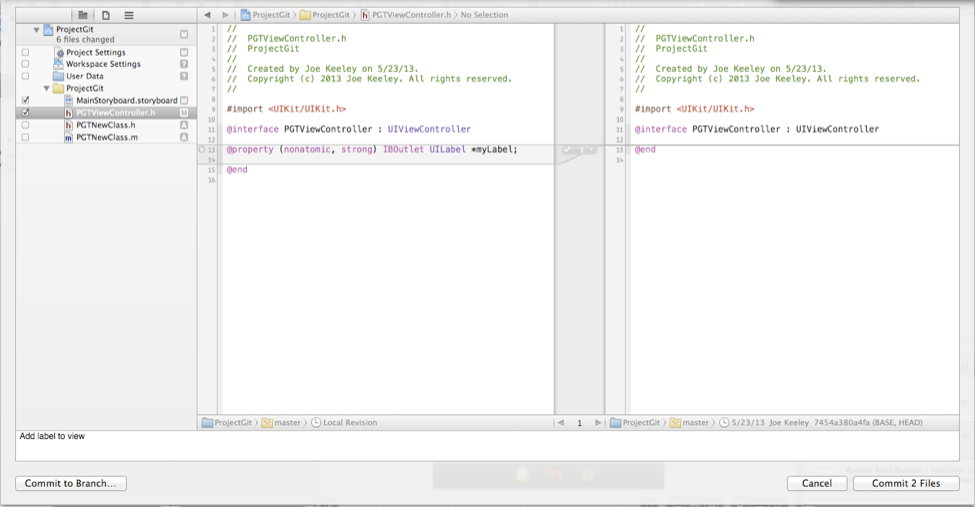
In this example, I have added a label to the storyboard with a corresponding property in the view controller, and have added a new class to the project. I only want to commit the label changes, so I have selected those and added a commit message in the bottom section. In addition to making file level selections for a commit, Xcode can do line level selections for a commit.
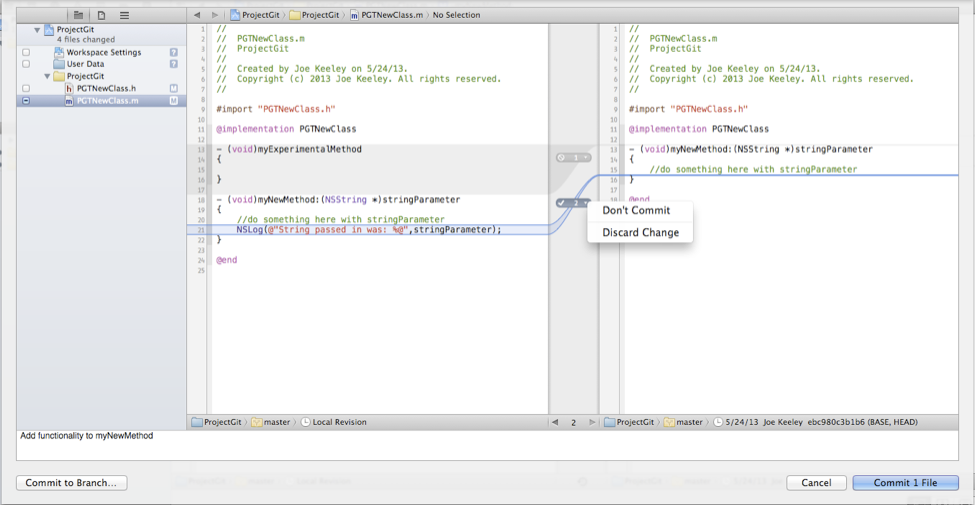
In this example, I have work in progress in myExperimentalMethod, but I have added the desired functionality to myNewMethod and would like to commit so other members of the team can use it while I finish myExperimentalMethod. By clicking on the numbers in the center column I can select whether a change should be included in or excluded from the commit, or I can discard the change.
Note that Xcode will not show deleted files that have been removed from the project. When a file is deleted from an Xcode project, the project will indicate that the project has been modified, but the file will no longer be visible in the Xcode project view. The deleted file will be staged for the next commit and will be included in the next commit, but it will not be visible in the project view or the commit view.
LOOKING AT HISTORY
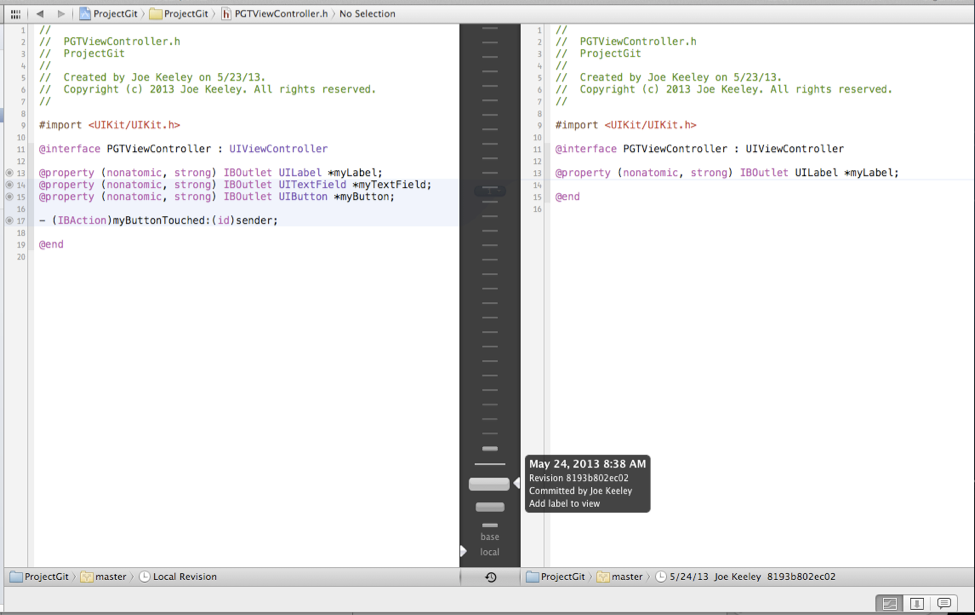
Xcode provides a Versions editor, which has three different perspectives on the git history for a file. To use the Versions editor, select the file in the Standard editor in Xcode, the switch to the Versions editor using the editor segmented control in the upper right hand corner of the Xcode window.

The three perspectives are Comparison, Blame, and Log, and can be selected using the segmented control in the lower right portion of the editor pane when the Versions editor is active.

The Comparison view will initially show changes in the working copy from the most recent commit. Changes can be discarded by clicking on the number in the center column and selecting Discard Change from the menu. The Comparison view can also compare any two arbitrary commits. To do this, click the clock icon at the bottom of the center column. Xcode will present a view of the commits that have taken place for the file. Adjust the two white pointers to select the version to display in each window. Xcode will display the commit information for each commit as you move the arrow past it. Once selected, Xcode will highlight the code differences between the versions.
If something in the code does not make sense or is not clear, it can be helpful to talk to the person who coded it. Blame view can identify the author of each line of code by showing who made each change in the file, and corresponding commit information for each change.

To see detailed information for each commit, hover over the name and date section and an info button will appear in the far right edge. Click the info button to see commit information. Clicking View Changes will show the comparison view that is used for committing for all the files included in that commit.
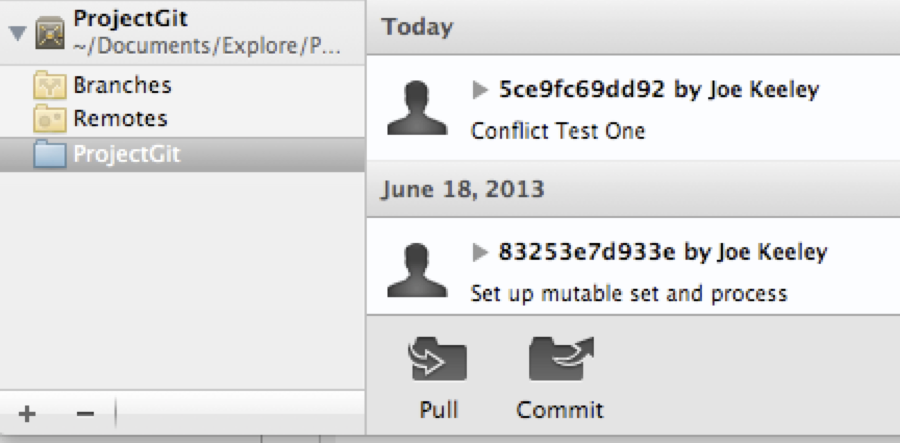
The Log view will show the history of commits in the right hand side of the view. Hovering over each commit will display an info button which can be clicked to show the same detailed information about each commit that Blame shows.

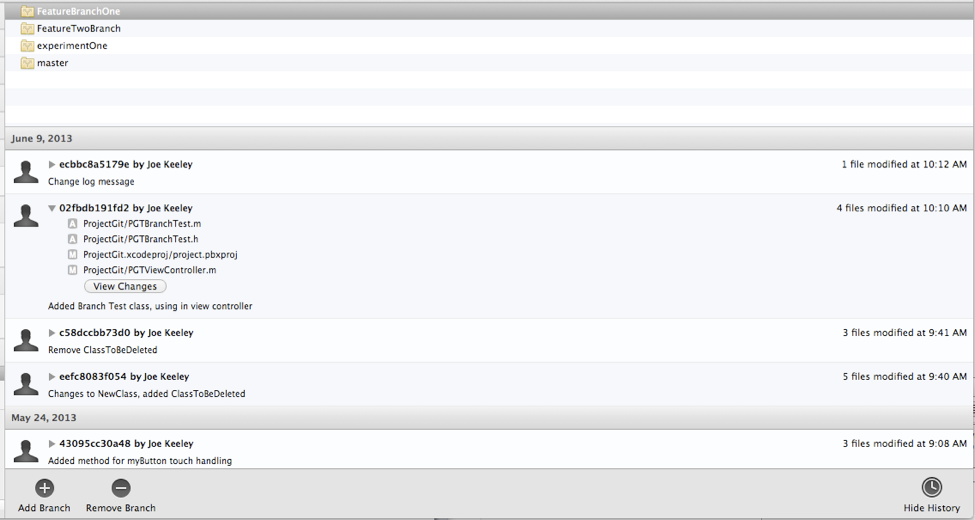
In the Repository section of the Organizer, logs are available for both the working copy and branches. If the working copy is selected, Xcode can even show commits specific to a selected file.
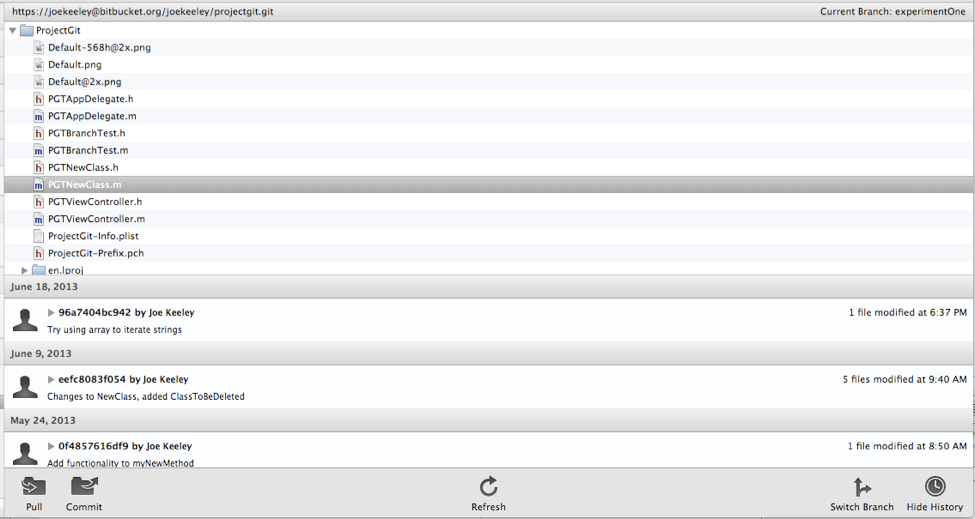
When looking at branches, select a branch to see recent commits for that branch. For all history, you can expand the commit by clicking on the arrow to the left of the commit hash to see what files were included in the commit, and you can click on the View Changes button to view all the changes in the comparison view.
USING BRANCHES
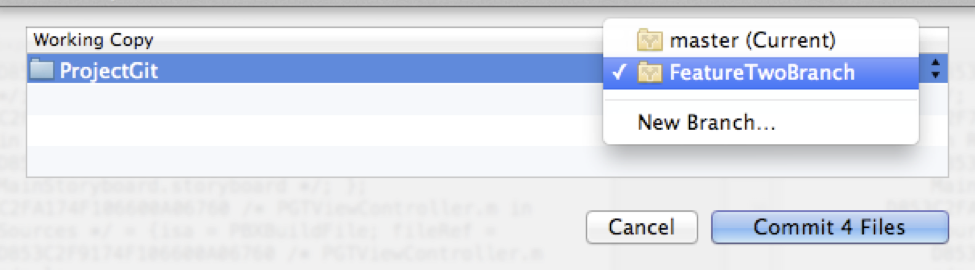
Branches can be a very effective tool to isolate new features or experiments in code. Xcode has pretty good support for branches, but it is not shown in the project view. The first method you can use to commit code to a branch is to select “Commit to Branch…” instead of “Commit X Files” from the commit view.
Xcode will ask you to select a branch to commit to, or will allow you to create a new branch.
Once you have committed to a branch from master, you will be automatically switched to that branch. You can continue making changes and commits to the branch. So how do you know what branch you are on in Xcode, or get back to the master branch, or switch to another branch? Visit the Repositories in the Organizer, find the repository for your project, and select the working copy.
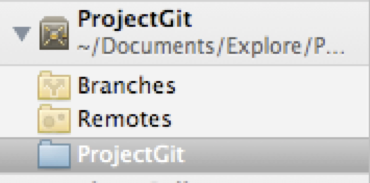
To see what branch you are currently on, look in the upper right hand corner of the Repository view.
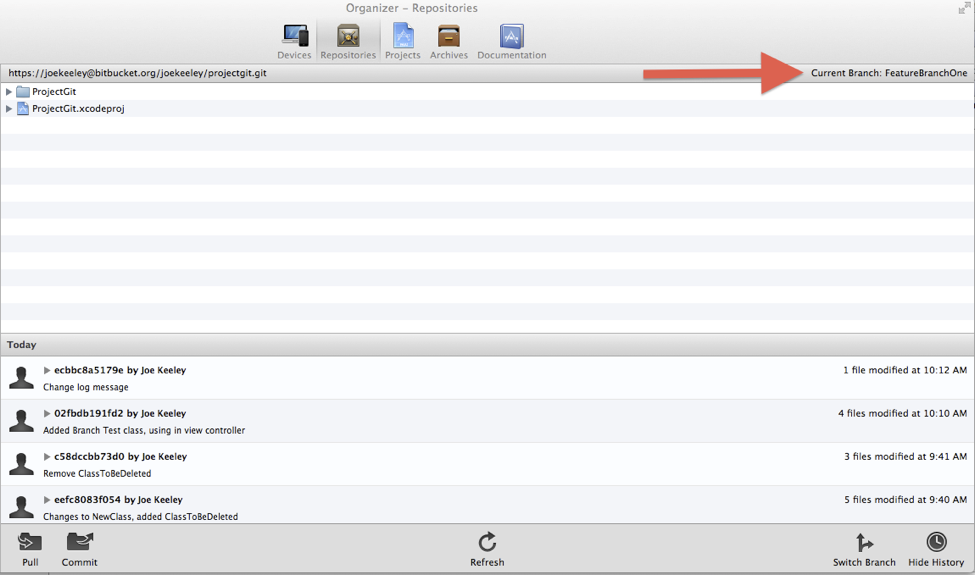
To switch back to master or to another branch, click the “Switch Branch” button in the lower right hand corner. Select another branch, and your Xcode project workspace will be updated to reflect the current contents of the other branch.
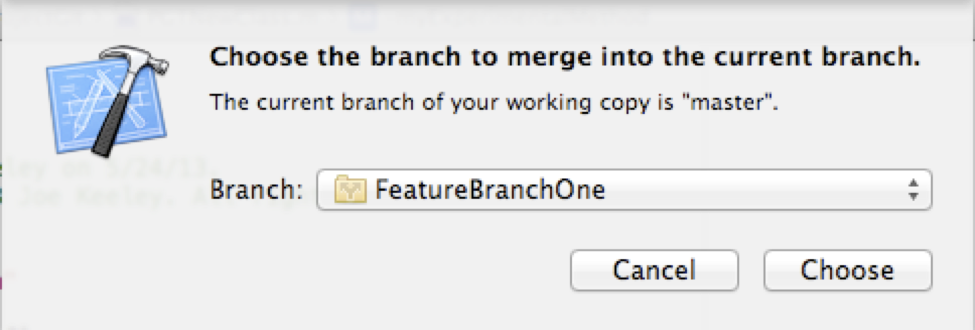
When you are ready to merge a branch, switch to the branch you want to merge into first from the Organizer. Then switch back to the project view, and select File | Source Control | Merger from the Xcode menu. Xcode will ask which branch you would like to merge into your current branch.
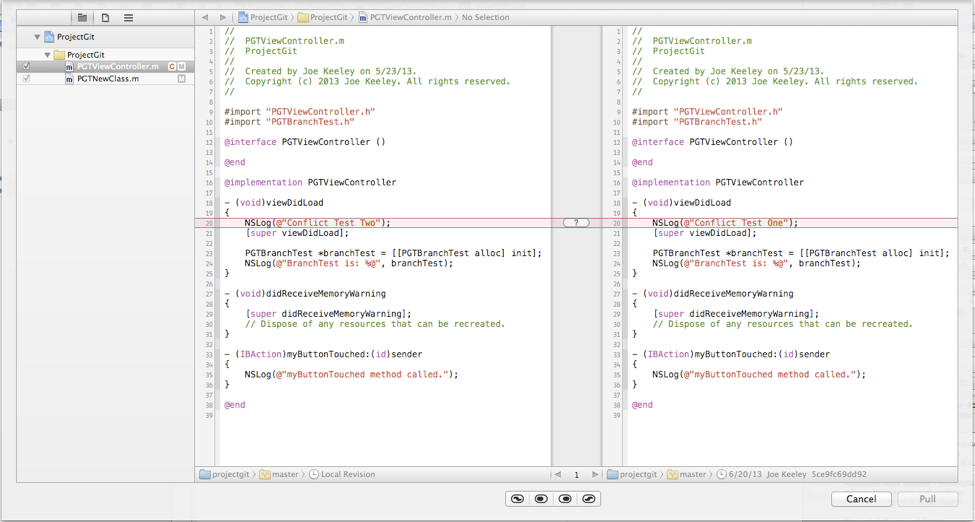
Xcode will then present a merge view, which will allow you to review each difference between the current branch and merge branch.

Use the sliders to selectively include or exclude changes from the branch in the merge.
If there is a conflict in the merge, the merge view will highlight the conflict in the merge view with red and a question mark in the center.
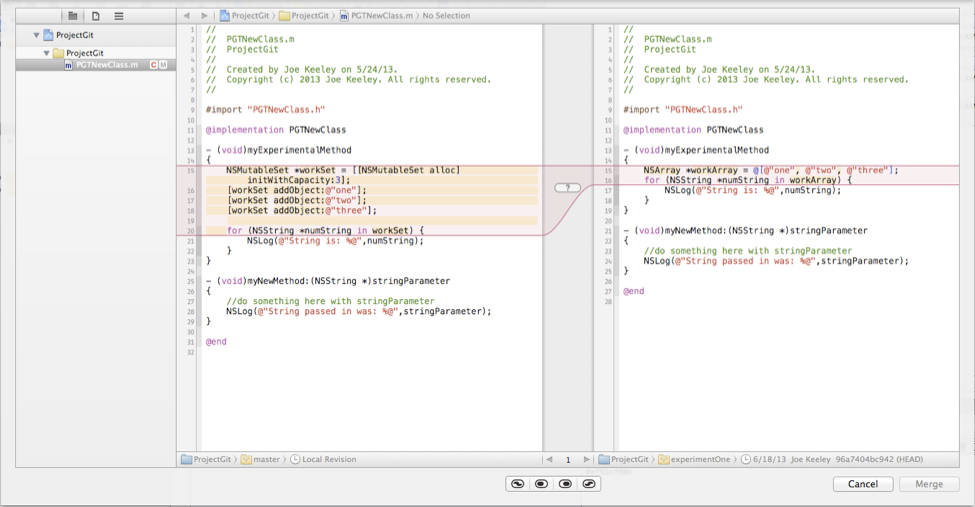
The merge view will offer four choices for resolving the conflict: keep both changes, placing the left before right, keep only the left changes, keep only the right changes, and keep both changes, placing the right before left. In addition the code can be directly edited in the merge view.
KEEPING IN SYNC WITH REMOTE REPOSITORIES
As you make changes in your local working copy you will want to keep them in sync with the remote repository. Xcode offers support for pulling from and pushing to a remote repository, and for tracking remote branches.
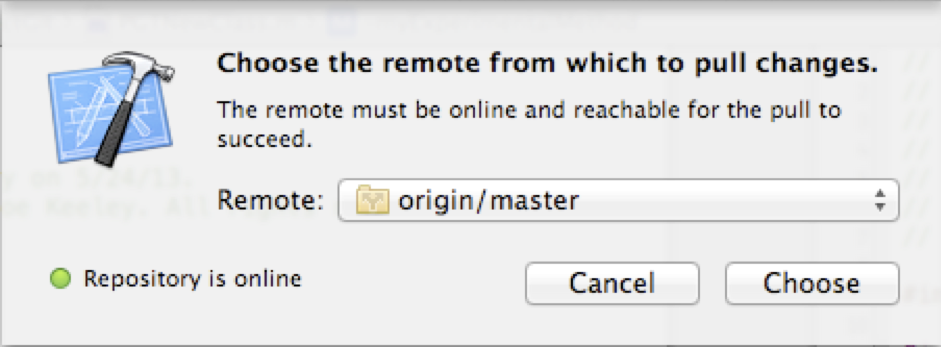
There are two ways to pull from a remote repository. The first is from the project window. Select File | Source Control | Pull from the Xcode menu when viewing a project window. If there are no uncommitted changes in the working copy, Xcode will present a dialog to select which remote and branch to pull from. (Note that a pull can be completed using command line Git when changes are present, but Xcode will not pull with uncommitted changes in the working directory.)
Alternatively, the Pull button from the Organizer Repositories view can be used when a working copy is selected.
If a conflict is detected on the pull, Xcode will present the merge viewer to resolve the conflict. Just like resolving a conflict between branches, the merge viewer can be used to select which change(s) should be kept and in what order they should be if both are desired. If you do not want to resolve the conflict, click the Cancel button in the merge view and the pull will not take place.
If the conflict is resolved, the working copy will be modified and will need to be committed and pushed.
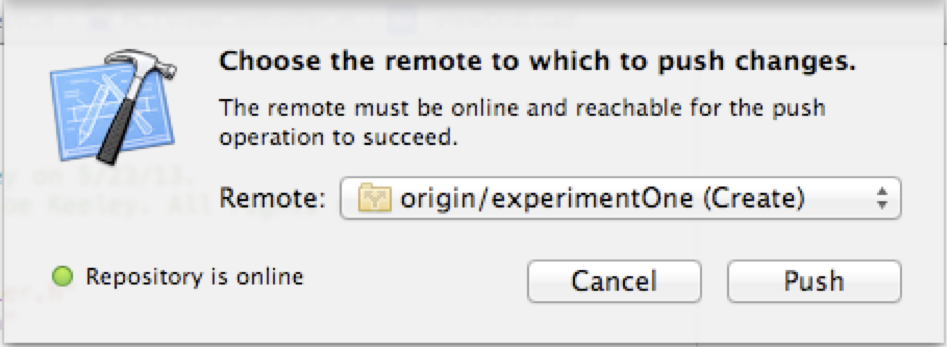
To push changes to the remote repository, select File | Source Control | Push from the Xcode menu when viewing a project window.

A branch can also be pushed to the remote repository. Xcode will detect if the branch does not yet exist in the remote, and will indicate if the branch will be created by a push.
Once a branch has been created on the remote repository, other working copies can track that branch. To track a branch, visit Organizer, Repositories, and select Remotes for the project repository. Expand the remote name to see the available branches. (In my testing, I was not able to get Xcode to refresh remote branches without restarting Xcode).
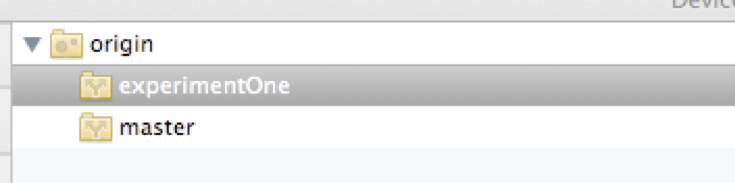
Select a remote branch and click the Track Branch button at the bottom of the view. This will pull down the branch from the remote repository to the local repository, will allow you to switch to the branch in Xcode, and will allow pulls and pushes to take place from it.
SUMMARY
As we have seen here, Xcode has very usable support for common Git tasks, including setting up Git for a new project, cloning an existing project, handling modifications and commits, viewing history, using branches, and pushing and pulling from remote repositories. Xcode does not have direct support for stashing, tags, or more advanced topics like rebasing or submodules. However, all of the items that Xcode does not support can be performed using the command line tools or using a third party tool. In my day to day work with a distributed development team, I am frequently able to perform all of my Git tasks in Xcode, and only rarely need to resort to the command line. Take a second look at Xcode’s Git support if you have not done so before, and give feedback to the Xcode team so they can keep enhancing and improving Git support in Xcode.