A Better Fullscreen Asset Viewer with QuickLook
Since last year I’ve spent a lot of time working on iPad apps for medical device companies. These companies want to be able to display their sales materials/digital assets to potential buyers on the iPad because of its gorgeous presentation. We can’t blame them. This is a great choice especially with the retina display on the third generation iPad. It’s incredibly compelling.
Our go-to solution for presenting these files until recently has been to just load everything into a UIWebView because it supports so many formats. Voila! Done! We like simple solutions to problems that would otherwise be very difficult.
This solution has worked great, but over time it’s become a noticeably dull spot in the app with some UX problems to boot. This is not good–especially for the part of the app that gets the most customer face time. It needs to shine. To go fullscreen, we just load a full size view controller modally. One issue with this approach though was that it only worked in landscape. For some reason it would get wonky (engineering parlance for, “um, I don’t know”) if we allowed both orientations since the rest of the app supported landscape only. It also had a nav bar that would never be hidden, so the user would always see it even when they were scrolling through the document content. Finally, there was no way to jump down deep into a document. If you needed to get to page 325, for example, you had to scroll all the way there. That’s just a bad user experience–incredibly tedious making it unlikely anyone would use it with a large document. These were some significant drawbacks and I didn’t have a good solution to bring the polish that this segment of the app deserved.
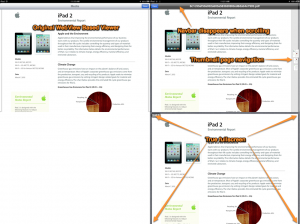
Then, while working on one of these apps, I got tasked with adding the “Open In…” capability that would allow any of the Keynote presentations to actually be opened in Keynote. While implementing it, I realized that the QuickLook feature, which is one of the default “Open In…” options, provided a simple yet robust fullscreen viewer that provides the polish we were missing. We could build a better asset viewer with QuickLook. In the screenshot below, you can see some of the basic differences between our original viewer implementation (on the left) and the QuickLook based one (right).
You notice that we now have a navigation bar that disappears as the user scrolls. The user can jump to a page by using the thumbnail page view control on the right hand side. The view is true fullscreen as everything but the content itself disappears.
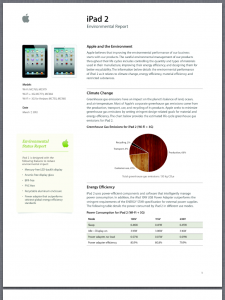
Another benefit of using the QuickLook preview controller is that both orientations work and look great as you can see here in the portrait orientation:
If you’ve worked with the QuickLook preview controller, you might have noticed that the action button is missing in the upper right hand corner of the preview window’s navigation bar. It’s funny how different companies have different requirements for the same component. While the first company wanted the “Open In…” feature, albeit just for Keynote documents, another company didn’t want export/editing functionality at all. This is only a problem of course for MS Office or iWork documents since others such as PDFs are read only, however, the second company didn’t want to the user have any editing capability at all. They are working hard to ensure the document versions are up to date and not edited by anyone who is not authorized to do so.
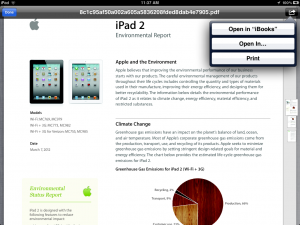
If you load the QuickLook preview by using a UIDocumentInteractionController, you get the action button and the user can do whatever they want with the documents. Here is what the actions popover looks like when using the standard UIDocumentInteractionController implementation:
You see here that you can open in iBooks, choose to open in anything else on the device that supports the format of the selected document, or print. My second client didn’t want those options, so in the end we decided not to use the UIDocumentInteractionController and instead implement our own viewer that is directly derived from the QLPreviewController class. At that point, all we had to do was override the -viewWillAppear: method and remove the right bar button item in the view’s navigation bar, like this:
iOS6 Update This technique of overriding the QLPreviewController will no longer work in iOS 6. I have contacted Apple about the situation, but they simply stated that it is no longer supported and it is considered a private API. If you would like to see more flexibility in this API and the ability to override certain aspects, please file a radar.
// Header
#import

@interface MLQuickLookPreviewController : QLPreviewController

@end

// Implementation
@implementation MLQuickLookPreviewController

- (void)viewWillAppear:(BOOL)animated
{
  [super viewWillAppear:animated];
  [[self navigationItem] setRightBarButtonItem:nil animated:NO];
}

- (BOOL)shouldAutorotateToInterfaceOrientation:(UIInterfaceOrientation)interfaceOrientation
{
  return YES;
}

@end
You can also see that we are allowing all orientations for this view controller in -shouldAutorotateToInterfaceOrientation:. That’s all we needed to do to get the QuickLook preview controller to behave the way our client specified–fullscreen preview without the ability to export or edit yet visible and navigable in both portrait and landscape orientations.
Of course, to use the QLPreviewController, you will need to add QuickLook.framework to your project and then import the headers <QuickLook/QuickLook.h> into your project somewhere such as in the derived QuickLook viewer class header as shown in the previous code block above. Then you can implement your custom previewer like this:
- (void)presentFullscreen
{
  MLQuickLookPreviewController *previewer = [[MLQuickLookPreviewController alloc] init];
  [previewer setDataSource:self];
  [previewer setCurrentPreviewItemIndex:0];
  [self presentModalViewController:previewer animated:YES];
}
Notice we’ve set the data source for our preview controller to self. This means that our class where we’re implementing this will need to implement the QLPreviewControllerDataSource methods. So in our header file, we need to specify
@interface MLDetailViewController : UIViewController

@end
And then in the implementation file, we need to implement these two methods:
#pragma mark -
#pragma mark QLPreviewControllerDataSource
- (NSInteger)numberOfPreviewItemsInPreviewController:(QLPreviewController*)controller
{
  return ([self asset]) ? 1 : 0;
}

- (id)previewController:(QLPreviewController*)controller previewItemAtIndex:(NSInteger)index
{
  NSString *path = [[self asset] pathOnDiskAtCachePath:CACH_PATH];
  return [NSURL fileURLWithPath:path];
}
Sometimes you might provide a list of assets to display, but in our case we just want to display one asset, so I check a local property to see if it is nil and return 1 if it is not and zero otherwise for the number of preview items. Then, when previewItemAtIndex gets called, I just return a file URL that points to the location of the file on disk. That’s it for the code that we need to write. And that’s it for providing a very attractive and functional fullscreen asset viewer on iPad.
Conclusion
Projects mature over time and certain duller aspects of our apps often start glaring at us while this maturing happens. On the iPad, presentation is of the utmost importance so making small visual tweaks that gradually add the polish our apps need and deserve is very important. Go forth and do likewise. Until next time.


