Core Data and the Undo Manager
*Note: This is a re-print from the Mac Developer Network.*
One of the nice things about developing software for OS X is all the “freebies” we get out of Cocoa. For example, when we are building a UI with text input we get undo support for free! How cool is that?
Likewise, when we are working with Core Data, it also has undo support built right in. Every `NSManagedObjectContext` has a NSUndoManager that we can use. However there are some situations where the default undo support is insufficient.
In this article we are going to walk through one such situation.
Edit Window Undo
—————-
There are situations where we want to group actions together so that from the user’s point of view they are an atomic operation. For example, if we have a window with an edit sheet; once the edit sheet is closed we want to avoid walking through the individual edits that occurred while the sheet was present.
However, while the sheet is present, we do want to give the user the ability to undo each individual edit. To perform this, we will be creating a commit group on the undo manager contained within the `NSManagedObjectContext` and we will use a separate Undo Manager that is responsible for the edit sheet. We could use the undo manager within Core Data for both but I have found it to be cleaner to keep them separated in this situation.
Building Our Application
————————
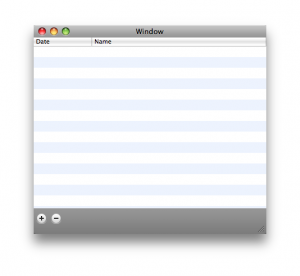
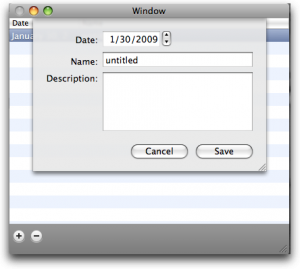
In this application the main window will present the user with a single table view which has two columns, a date and a name. The table itself is non-editable but double clicking on a row will present a sheet for the user to edit the row. In addition, clicking on the add button will present the same sheet but with a new entry. The edit sheet contains three fields for data entry as shown.
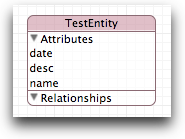
The data model for our project contains a single NSManagedObject named TestEntity with three properties: name, date and desc. The model is shown in.
Implementing the App Delegate
—————————–
Most of the `AppDelegate` is straight out of the Core Data Application template provided by Xcode. However we are going to add a double click action to the table view as well as handling for the add and remove buttons. To do this we need to add the table view as an outlet with the AppDelegate. We also need to add the `NSArrayController` as an outlet.
@interface AppDelegate : NSObject
{
IBOutlet NSWindow *window;
IBOutlet NSArrayController *arrayController;
IBOutlet NSTableView *tableView;
NSPersistentStoreCoordinator *persistentStoreCoordinator;
NSManagedObjectModel *managedObjectModel;
NSManagedObjectContext *managedObjectContext;
}
– (NSManagedObjectContext *)managedObjectContext;
– (IBAction)saveAction:(id)sender;
– (IBAction)addEntity:(id)sender;
– (IBAction)removeEntity:(id)sender;
@end
Once we have those bound in Interface Builder we can finish the configuration within the `-awakeFromNib:` method.
– (void)awakefromNib
{
[tableView setTarget:self];
[tableView setDoubleAction:@selector(editEntry:)];
}
In the `-awakeFromNib:` we set ourselves as the target for the tableView and add the `-editEntry:` method as its double click action. Now when a user double-clicks on a row our method will be called.
– (void)editEntry:(id)sender
{
id object = [[arrayController selectedObjects] lastObject];
if (!object) return;
SEL endSelector = @selector(editSheetDidEnd:returnCode:object:);
[[[self managedObjectContext] undoManager] beginUndoGrouping];
[[[self managedObjectContext] undoManager] setActionName:@”Undo Object Edit”];
[EditWindowController editSheetForWindow:window
delegate:self
endSelector:endSelector
entity:object];
}
In the `-editEntry:` method we first get the object for the row that was clicked on. We do a quick nil check and then hand the object off to our edit window controller. As you can see we have a convenience method in our `EditWindowController` to make it easy to create one, pass off the object and display the sheet. The method also accepts a delegate and a callback `@selector`.
You should pay particular attention to the line of code in the middle; the call to the NSManagedObjectContext’s NSUndoManager. In that line we are starting a grouping before we present the sheet. This guarantees that any changes made while the sheet is displayed will be considered “atomic” to the `NSUndoManager` contained within the `NSManagedObjectContext`.
Implementing the EditWindowController
————————————-
The `EditWindowController` is a subclass of `NSWindowController` with a fairly simple header.
#import
@interface EditWindowController : NSWindowController
{
NSUndoManager *undoManager;
NSManagedObject *testEntity;
IBOutlet NSObjectController *entityController;
}
@property (assign) NSManagedObject *testEntity;
+ (void)editSheetForWindow:(id)window
delegate:(id)delegate
endSelector:(SEL)selector
entity:(NSManagedObject*)object;
– (IBAction)saveAction:(id)sender;
– (IBAction)cancelAction:(id)sender;
@end
We retain a reference to the `NSManagedObject` that gets passed in, an `NSObjectController` which is initialized within Interface Builder and a `NSUndoManager` which we will discuss below. In addition to the iVars, we also have the accessor method that we used in the `AppDelegate` and two IBActions for the buttons on the edit sheet.
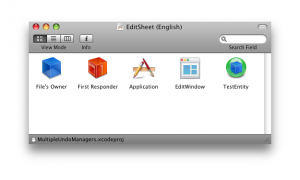
The interface builder xib only has a couple of objects:
The idea behind this design is that the window controller will receive an object which we will set into the `NSObjectController`. The panel/sheet will then feed from this `NSObjectController` to display all of the editable fields. Once the edit is complete the user will click either save or cancel which will close the sheet and cause the callback `@selector` to fire.
+ (void)editSheetForWindow:(id)window
delegate:(id)delegate
endSelector:(SEL)selector
entity:(NSManagedObject*)object;
{
EditWindowController *controller;
controller = [[EditWindowController alloc] initWithWindowNibName:kNibName];
[controller setTestEntity:object];
[NSApp beginSheet:[controller window]
modalForWindow:window
modalDelegate:delegate
didEndSelector:selector
contextInfo:object];
}
Within our helper method we take advantage of the existing underlying API. We first initialize an instance of the `EditWindowController` using the parent’s `-initWithWindowNibName:` which will load in the nib and attach all of the bindings for us. Once that is complete we use the `-setTestEntity:` method to pass in the NSManagedObject which will populate all of the fields. We then use the NSApplication call `+beginSheet: modalForWindow: modalDelegate: didEndSelector: contextInfo:` to present our associated window (a `NSPanel` really) as a sheet on top of the passed in window; which in this case happens to be the main window for our application. The beauty of using this method to present the sheet is that we do not need to retain the delegate or the callback method, the existing structure handles it for us.
– (void)saveAction:(id)sender;
{
[[self window] orderOut:sender];
[NSApp endSheet:[self window] returnCode:NSOKButton];
}
– (void)cancelAction:(id)sender;
{
[[self window] orderOut:sender];
[NSApp endSheet:[self window] returnCode:NSCancelButton];
}
We can further take advantage of the underlying structure in the save and cancel methods. In each of these methods the only thing we need to do is call `-orderOut:` on our window and then call `-endSheet: returnCode:` on the NSApplication itself. This will in turn call the delegate’s callback method with the appropriate return code. Keeps our sheet very simple and clean.
The interesting part of this sheet is the undo manager. In Interface Builder, I assigned the `EditWindowController` as the delegate to the window. This means that the window looks to the `EditWindowController` to get a reference to the `NSUndoManager` that it should be using. It is possible to use the `NSUndoManager` that is part of Core Data but we want to keep the edits made in this window local. Therefore we are going to create a separate `NSUndoManager`.
– (NSUndoManager*)windowWillReturnUndoManager:(NSWindow*)window
{
if (!undoManager) {
undoManager = [[NSUndoManager alloc] init];
}
return undoManager;
}
We create this `NSUndoManager` lazily. We wait until it is requested the first time and then initialize it.
Handling the Sheet Closing
————————–
When the user is done with the sheet they will either hit save or cancel. Both of those actions will cause the delegate’s callback method to be invoked.
– (void)editSheetDidEnd:(id)sheet returnCode:(int)returnCode object:(id)object
{
[[[self managedObjectContext] undoManager] endUndoGrouping];
if (returnCode == NSOKButton) return;
[[[self managedObjectContext] undoManager] undo];
}
In the callback method within the AppDelegate we first end the undo grouping that we started just before presenting the sheet. We then check to see if the user pressed save or cancel. If they pressed save we return and are done. If they pressed cancel, however, we then request an undo on the `NSManagedObjectContext`’s `NSUndoManager`. This will roll the `NSManagedObject` back to the state it was before we presented the sheet to the user. Because we named this action the user will actually see it in the Edit menu.
Handling Add Item
—————–
We can reuse this edit sheet for when we are dealing with a new entity as well as editing an existing entity. The only difference is in the `AppDelegate`’s `-addEntity:` method.
– (void)addEntity:(id)sender;
{
NSManagedObject *newObject;
NSManagedObjectContext *moc = [self managedObjectContext];
SEL endSelector = @selector(editSheetDidEnd:returnCode:object:);
[[[self managedObjectContext] undoManager] beginUndoGrouping];
[[[self managedObjectContext] undoManager] setActionName:@”Undo Object Add”];
newObject = [NSEntityDescription insertNewObjectForEntityForName:@”TestEntity”
inManagedObjectContext:moc];
[EditWindowController editSheetForWindow:window
delegate:self
endSelector:endSelector
entity:newObject];
}
Instead of grabbing the selected object from the NSArrayController we construct a new one. However we set the undoGrouping to begin *before* we create the object. This allows us to include the creation of the `NSManagedObject` as part of the atomic undo. If the user hits cancel on the sheet, the `NSManagedObject` will automatically be removed from the `NSManagedObjectContext` for us.
Handling the Remove Item
————————
Like the Add menu item above, we can use the `NSUndoManager` to make the removing of objects easy for us as well.
– (void)removeEntity:(id)sender;
{
id object = [[arrayController selectedObjects] lastObject];
if (!object) return;
[[[self managedObjectContext] undoManager] beginUndoGrouping];
[[[self managedObjectContext] undoManager] setActionName:@”Undo Object Remove”];
[[self managedObjectContext] deleteObject:object];
[[[self managedObjectContext] undoManager] endUndoGrouping];
}
Here we are grabbing the selected object from the table and if it exists we remove it from the `NSManagedObjectContext`. However, we make sure to give the action a name. Since it is a single action there is no need for a grouping but it is helpful, and improves the user experience to name the action so that the user understands exactly what they are undoing.
Wrap-Up
——-
In this short article, we walked through how the `NSUndoManager` plays very nicely with Core Data and how we can use more than one `NSUndoManager` to keep the edits separate from each other instead of rolling them all into one undo stack and thereby avoiding all of the complication that entails.
It is possible to combine all of this work within one `NSUndoManager` but that causes the undo stack to be larger and more complicated unnecessarily. There is no reason to retain the edits that were made within the edit sheet in the same `NSUndoManager` that handles the changes to the context. By pulling these into their own `NSUndoManager` we can keep each separate function of the UI separate and easier to manage.
[Download Sample Code](http://cimgf.com/files/MultipleUndoManagers.zip)


