Landscape Tab Bar Application for the iPhone
As you develop applications for the iPhone, you will likely use the project templates provided in Xcode. One such template, called “Tab Bar Application” helps you get a tab bar application set up quickly, but by default the application it generates only supports portrait mode for display. So how can you make the application also support landscape or even only support landscape? In this post we will address that question.
To duplicate the problem, create a new tab bar application in Xcode. To do so,
- Press Command-Shift-N and select Tab Bar Application in the iPhone OS | Application templates. Click Choose…
- Provide a name for the project. I chose “Tab Test”
- Click Save
The first thing you’ll notice is that the template has generated two classes for us. One called FirstViewController, which is used to control the first view (ya think?). The other is called Tab_TestAppDelegate which is our application delegate–the entry point and main controller class for our application.
Take a look at the stub code generated in the FirstViewController. It is commented out for the most part, but you’ll notice that there is a method in there that gives us what we want for allowing different orientations for our application. In particular, we are interested in -shouldAutorotateToInterfaceOrientation. Uncomment that code and have it simply return YES. This setting will enable the controller to support all orientations.
// Override to allow orientations other than the default portrait orientation.
- (BOOL)shouldAutorotateToInterfaceOrientation:(UIInterfaceOrientation)interfaceOrientation {
    // Return YES for supported orientations
    return YES;
}
This should cause our view to change orientation when the device is turned. Build and run the application using the simulator. Once the simulator has loaded the application, select Hardware | Rotate Left. You will notice that while the device did rotate, the view did not. Why is this?
All Or None
Remember that the default tab bar application template creates a tab bar component with two views. While we have explicitly told the FirstViewController object to allow all orientations, we have not done so with our second view. The way the tab bar controller works is that if any of the view controllers have a limitation on the orientation of the view, then all views are constrained by the same limitation.
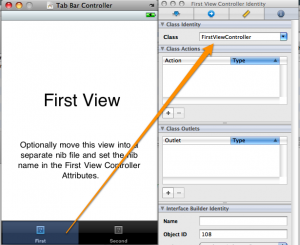
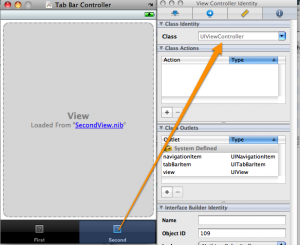
What this means is that all view controllers must override the call to -shouldAutorotateToInterfaceOrientation to return the appropriate setting–YES to allow all. In our default tab bar app, we have not assigned the second view to a controller because we have not defined one, so where is it getting its controller from? Well, the answer is found in interface builder. If you double-click MainWindow.xib in the Resources group of the Xcode project, Interface Builder will load. Click on the tab for the first view in the main window, and then select the Identity tab in the Inspector, you’ll see what is going on.
Notice in the first view Class field, it is set to FirstViewController. Take a close look now at our second view by clicking the second tab.
Notice that the class we’re using here is the base UIViewController class. This is our view’s controller. It only provides the base functionality–which is to say it doesn’t provide a whole lot. Furthermore it implements the default functionality. The default setting for the orientation of a view controller is portrait only. In other words, only derivative classes are going to be able to override -shouldAutorotateToInterfaceOrientation and set it to something other than the default.
If you want your application to be able to support more than the default portrait orientation, all of your tab views must have their own view controller that overrides -shouldAutorotateToInterfaceOrientation
Conclusion
The iPhone is a fun and interesting computing platform. It is very powerful, but it has a lot of nuances that make it fairly different from what you may be used to on OS X. The trick is to remember the principles you’ve already learned in Cocoa, MVC in particular, and you should be able to deal with the nuances and make them submit to your own will. Until next time.


I have a question related to autorotate and UITabBarController: did anyone find a way to allow the interface to rotate when a tab / view controller is selected through the “More” tab?
I my applications, even if all my view controller did return YES on -shouldAutorotateToInterfaceOrientation invocation, autorotate stop to work when I select a tab in the “More” tab. If I pop back this controller to the “More” table view, then autorotate work again.
[…] informative piece by Matt Long. Now that the NDA is dead, we are getting a lot of great iPhone App Tutorials, which will lead to […]
[…] Landscape Tab Bar Application for the iPhone: Follow this tutorial to learn about making the tab bar application support landscape orientation. [Cocoa Is My Girlfriend] […]
[…] Landscape Tab Bar Application for the iPhone: Follow this tutorial to learn about making the tab bar application support landscape orientation. [Cocoa Is My Girlfriend] […]
[…] Landscape Tab Bar Application for the iPhone: Follow this tutorial to learn about making the tab bar application support landscape orientation. [Cocoa Is My Girlfriend] […]
[…] Landscape Tab Bar Application for the iPhone: Follow this tutorial to learn about making the tab bar application support landscape orientation. [Cocoa Is My Girlfriend] […]