Fun With UIButtons and Core Animation Layers
Upon first glance, the UIButton class doesn’t seem to provide what you might expect in terms of customization. This often causes developers to resort to creating buttons in an image editor and then specifying that in the Background field in Interface Builder. This is a fine solution and will likely give you what you need, but with Core Animation layers there is a simpler way to achieve the look you want without having to create an image. This post will demonstrate how.
Setting a Background Color
In Interface Builder, you can specify a background color for your button if you are using the ‘Custom’ button setting, but when you run the application, the button will display as a block with no rounded corners. This is because custom buttons don’t really have any default attributes defined. It’s completely up to you to define them. Core Animation layers can help.
Note: Before I get into the source code, I want to remind you that you’ll need to add the QuartzCore framework to your project and #import <QuartzCore/QuartzCore.h> into one of your header files to have Core Animation layer support. I normally add this import statement to my precompiled header (.pch) file.
What Interface Builder doesn’t give you, you can still take advantage of by writing a little bit of code. For example, if you want your custom button to have a red background color with rounded corners and a border, you need to define an outlet in your view controller where the button will be referenced and set the following attributes on the UIButton’s layer.
[[button layer] setCornerRadius:8.0f];
[[button layer] setMasksToBounds:YES];
[[button layer] setBorderWidth:1.0f];
With this code the layer gets a corner radius of 8.0 and the -setMasksToBounds: tells the button’s layer to mask any layer content that comes below it in the layer tree. This is necessary in order for the layer to mask off the rounded corners.
Finally, set the border width to 1.0 to display an outline around the button. The default color for this border is black. You can change it to anything you like using -setBorderColor: on the layer passing it a CGColorRef (e.g. [[UIColor greenColor] CGColor] would give you a green border).
iPhone Development Protip: Rounding corners is possible on any UIView based view. All UIViews have a root layer. You simply call -setCornerRadius: and -setMasksToBounds: on the view’s layer and your corners will be rounded. It is that simple.
You can set the background color in Interface Builder or in code–whichever you prefer. There are two ways to do this in code. One using the layer and one using the UIView call to -setBackgroundColor:.
// Core Animation way
[[button layer] setBackgroundColor:[[UIColor redColor] CGColor]];
// UIView way
[button setBackgroundColor:[UIColor redColor]];
The main difference between the two is that the layer works with a CGColorRef while the UIView works with a UIColor. It’s a subtle difference, but one that you should know.
Gradient Buttons Rule
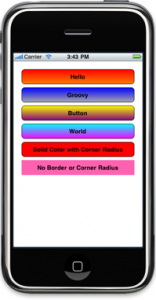
The demo app uses some ultra-bright gaudy looking color gradients just for effect. I suggest you don’t use something so loud and obnoxious. A more subtle difference between colors will look better. Of course this is subjective, so do what you like.
To achieve this gradient look, I use a CAGradientLayer and add it to the root of the button’s layer tree. In fact, for the demo application, I created a UIButton derived class that encapsulates the gradient layer creation and drawing. Here is its implementation:
#import "ColorfulButton.h"

@implementation ColorfulButton

@synthesize _highColor;
@synthesize _lowColor;
@synthesize gradientLayer;

- (void)awakeFromNib;
{
    // Initialize the gradient layer
    gradientLayer = [[CAGradientLayer alloc] init];
    // Set its bounds to be the same of its parent
    [gradientLayer setBounds:[self bounds]];
    // Center the layer inside the parent layer
    [gradientLayer setPosition:
                CGPointMake([self bounds].size.width/2,
                       [self bounds].size.height/2)];

    // Insert the layer at position zero to make sure the
    // text of the button is not obscured
    [[self layer] insertSublayer:gradientLayer atIndex:0];

    // Set the layer's corner radius
    [[self layer] setCornerRadius:8.0f];
    // Turn on masking
    [[self layer] setMasksToBounds:YES];
    // Display a border around the button
    // with a 1.0 pixel width
    [[self layer] setBorderWidth:1.0f];

}

- (void)drawRect:(CGRect)rect;
{
    if (_highColor && _lowColor)
    {
        // Set the colors for the gradient to the
        // two colors specified for high and low
        [gradientLayer setColors:
                     [NSArray arrayWithObjects:
                            (id)[_highColor CGColor],
                            (id)[_lowColor CGColor], nil]];
    }
    [super drawRect:rect];
}

- (void)setHighColor:(UIColor*)color;
{
    // Set the high color and repaint
    [self set_highColor:color];
    [[self layer] setNeedsDisplay];
}

- (void)setLowColor:(UIColor*)color;
{
    // Set the low color and repaint
    [self set_lowColor:color];
    [[self layer] setNeedsDisplay];
}

- (void)dealloc {
    // Release our gradient layer
    [gradientLayer release];
    [super dealloc];
}
@end
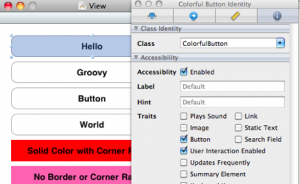
Now, when I’m creating a button in Interface Builder, I can make it of class ColorfulButton and then set an outlet for it in my view controller.
If I don’t set colors for a gradient, it will just render the button using the background color I specify for it in Interface Builder. If, however, I want to take advantage of the gradient capability, I set the gradient colors in my view controller as shown in the following code snippet:
- (void)viewDidLoad {
    [super viewDidLoad];

    [button1 setHighColor:[UIColor redColor]];
    [button1 setLowColor:[UIColor orangeColor]];

    [button2 setHighColor:[UIColor blueColor]];
    [button2 setLowColor:[UIColor lightGrayColor]];

    [button3 setHighColor:[UIColor yellowColor]];
    [button3 setLowColor:[UIColor purpleColor]];

    [button4 setHighColor:[UIColor cyanColor]];
    [button4 setLowColor:[UIColor magentaColor]];
}
These are the first four buttons you see in the demo app screenshot above. The buttons are declared in the view controller header as show in the following snippet:
#import
#import "ColorfulButton.h"

@interface ColorfulButtonsViewController : UIViewController {
    IBOutlet ColorfulButton *button1;
    IBOutlet ColorfulButton *button2;
    IBOutlet ColorfulButton *button3;
    IBOutlet ColorfulButton *button4;
}
@end
The CAGradientLayer supports adding an array of colors and will automatically render them linearly with equal distribution. It will also allow you to specify the distribution pattern, however, to keep it simple here I just use two colors represented by the upper color called highColor and the lower color called lowColor. If you want to add more complex gradients, you could modify my ColorfulButton class to take an array of colors as well. I leave this as an exercise for the reader.
Conclusion
Next time you need to customize a button, consider using Core Animation layers first. You may be surprised at what all you can achieve without having to resort to creating images to use as the button background. I have included the source code for this blog post below. Let me know if you have any thoughts or questions about it in the comments section. Until next time.


Wow – I didn’t know you could do that, in the past I had been setting background images like you mentioned. This has potential for nice and easy effects – thanks for sharing!
Hi, thanks for sharing. I forgot I could use this. I usually use images and even create them by code one in this scenarios. What do you think is the performance penalty of this method against straight images?
Cheers!
[…] via Cocoa Is My Girlfriend » Fun With UIButtons and Core Animation Layers. […]
[…] By changing the layer attributes of the button is it possible to keep the rounded button look while changing the color, and using CAGradientLayer it is possible to add some great looking gradients. You can see Matt’s tutorial for doing this here along with a nice sample application: Fun With UIButtons and Core Animation Layers […]
[…] by this post on Cocoa Is My Girlfriend, I decided to recreate the buttons presented in iPhone […]
[…] l’article : Cocoa Is My Girlfriend » Fun With UIButtons and Core Animation Layers. AKPC_IDS += […]
Thanks for the tutorial. Do you have a pointer for adding a drop shadow to the buttons?
Great post. Adding a drop shadow would really complete this class. But as it is. Great Job!
First time reader. Love the blog!
[…] Fun With UIButtons and Core Animation Layers […]
Nice!
I actually didn’t realize this consequence of UIView being layer-based and instead wrote a tiny category that added a class-method to UIImage in order to easily generate glass-style-/gradient-buttons in code…
I have to say I pretty much prefer doing it your way — it feels much more…appropriate.
[…] zijn andere oplossingen (bijvoorbeeld met “gestretchde-png-files”) en ik vond deze ook erg charmant maar uiteindelijk vind ik dit gewoon het […]
hi,
I have tried to make rounded rectangle button, but the color is not changed and have the following warning in these lines that : no -setCornerRadius etc. method found.
[[loginButton layer] setCornerRadius:8.0f];
[[loginButton layer] setMasksToBounds:YES];
[[loginButton layer] setBorderWidth:1.0f];
[[loginButton layer] setBackgroundColor: [COLOR_BUTTON_LOGIN CGColor] ];
I got it.
the code needs to add the lib,
import
(You should write this for the newbies like me :). It took a long to figure it out. I had QuartzCore and CoreGraphics framework imported, but still need the .h file.
Thanks for the tutorial. its great!
Thanks for the great code!
I however had an access violation, and had to change to the following:
@property (nonatomic, retain) UIColor *_highColor;
@property (nonatomic, retain) UIColor *_lowColor;
You had (assign) instead, and in “drawRect” the colors were no longer accessible.
I had a CustomerButton on two different view controllers. The first one showed fine, but when navigating to the second one, the crash would occur.
Both view controllers were in separate nib’s.
Thanks,
Scott
[…] I originally learned about this stuff from this blog post. […]
This is very neat, but how can you set different background colors for the different states (disabled, highlighted, etc)?
I noticed this class doesn’t work if you try to instantiate the ColorfulButton directly, rather than go through Interface Builder. I have some ideas, but how would you attempt to fix this limitation? Thanks.
This is great. Thanks. However, I have a problem. If I call ColorfulButtonsViewController from the main delegate as a:
[window addSubView:viewController.view];
I can send colorWithRed:126.0/255.0 green:179.0/255.0 blue:27.0/255.0 alpha:1.0]]; or the like in the setHighColor call and everthing works fine.
However, if the main delegate calls a UINavigationController which in turn calls the exact same class with a:
[self.navigationController pushViewController:buttonViewController animateed:YES];
the same code results in an EXC_BAD_ACCESS crash. It is crashing on in the drawRect procedure in the ColorfulButton class. I can hardcode the [UIColor colorWithRed… into the gradientLayer call and it works, when I try to pass “colorWithRed…” in setHighColor or setLowColor is crashes.
Again, the exact same code runs correctly if I don’t go through the UINavigationController.
Any help would be appreciated. Thanks.
(did I mention it’s the same class code).
Also, if I switch the “colorWithRed…” code back to “redColor” or the like, it works regardless of how you arrived at the ColorfulButtonsViewController class.
[…] Cocoa Is My Girlfriend » Fun With UIButtons and Core Animation Layers (tags: uibutton cocoa core animation layer) […]
Fun With UIButtons and Core Animation Layers…
…
Thank you for your post.
I find it very useful for my project.
Hi ,
This is a Great work,
I have tried it out, it works great,
However, when I added to UITableCellView, it does not work.
any idea?
[…] http://www.cimgf.com/2010/01/28/fun-with-uibuttons-and-core-animation-layers/ […]
[…] ????????UIButton???????? ????????????????? […]
[…] PS: I got the code for the GradientView from somewhere some months ago; it works very well (other than exposing the aforementioned memory leak). You can find the code here. […]
You should not use -drawRect: to setup up properties of a CALayer !
The job of that method is only to DRAW content, never to setup properties, especially of a layer, when you know that drawRect: is specifically called from a layer’s drawLayer:inContext: method. This is dangerous and counter-productive.
This property of the CAGradientLayer should be set when the user sets the low or high colour, and only then.